Creative Double Exposure Effect – Photoshop Tutorial
bhadra 0 Comments Photoshop
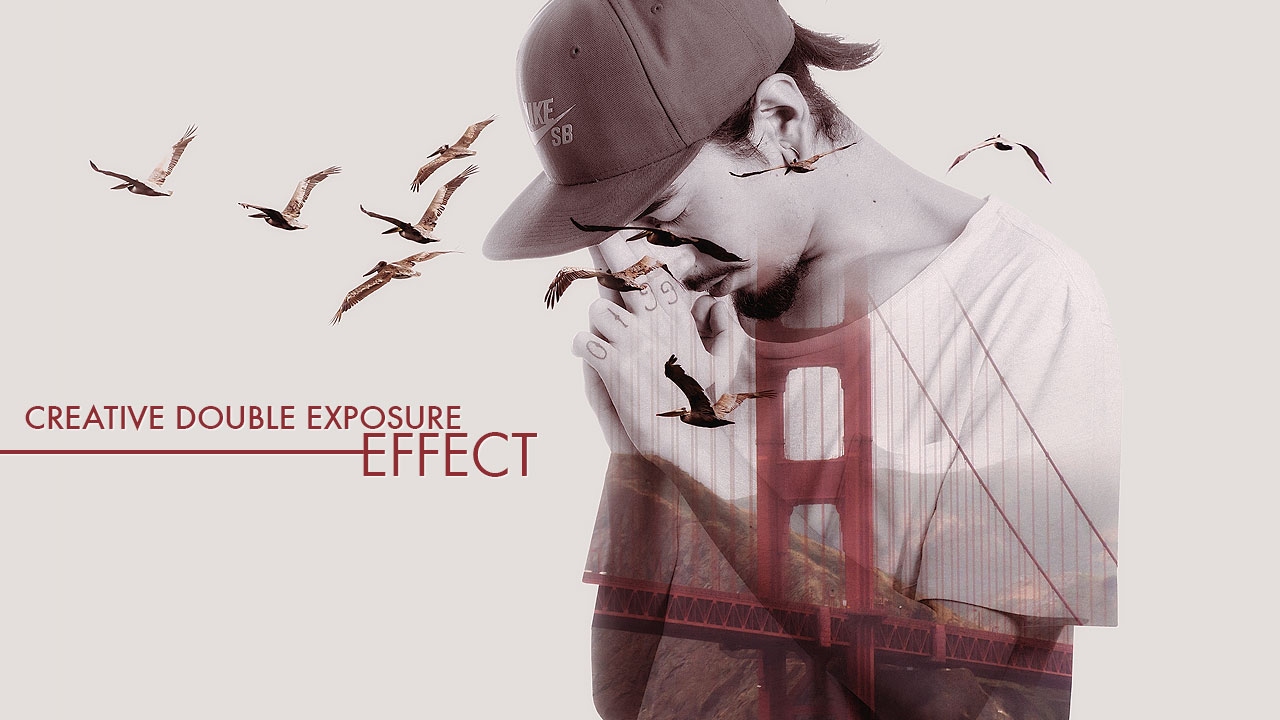
Hello everyone I will show you how I created this cool double exposure effect image that you can see in here using Adobe Photoshop alright, fantastic so! LET’S GET TO IT!! Alright so I’ll go ahead and open Adobe Photoshop and I’ll take the image I’ll be using and open it in here alright, now I need to make a selection of the model but since it’s a bright image and the background also is white I’ll go to adjustments and apply a Level Adjustment on it just to darken it a little bit so I’ll take the midtones in here and I’ll drag them into the right and now I can make my selection but I’ll make sure that I’m still on the level adjustment layer and I’ll go and select the Quick Selection tool in here and I will quickly make a selection of the model just like this let me delete this level adjustment layer now and I’ll go and open the Select and Mask I’ll take the Refine Edge brush and I’ll try to improve the selection of the hair in here just like this now, I’ll change the output to Selection and I’ll press OK now I’ll press CTRL+J to paste my selection in a new layer and I’ll delete this one in here and I’ll name this Model alright, now I’ll go to adjustment in here and choose Solid color I’ll change the color to white for now and I’ll press OK I’ll take it and put it under the model layer and I’ll name it BG for Background now I’ll go and open the second picture I’ll be using I’ll take it and open it in a new tab and I’ll drag it to the other tab in here alright, let me name it Bridge and I’ll put down it opacity around 50% this way I can see where I want to exactly placed for the exposure effect alright, now I’ll press CTRL+T to make the image smaller just around here and I’ll click on this check mark to commit the change alright now, I’ll bring back the opacity to 100% again now I’ll select the model layer and I’ll hold CTRL on my keyboard and I will one click on it, to load the selection of the model and then I’ll select the bridge layer and I’ll one click on this layer mask icon to put it inside a silhouette of the model alright, now I’ll go to the BG layer and I’ll double click on it and I’ll sample a color from the bridge sky in here and I’ll press OK alright, now I’ll select the bridge layer again and I’ll change the blending to Multiply now, I’ll make a copy of the bridge layer so I’ll press CTRL+J and I’ll take the layer mask and I’ll delete it and then I’ll change the blending mode to Darken instead of Multiply and I’ll apply a black layer mask on it so I’ll hold ALT on my keyboard and one click on this layer mask icon and then I’ll make sure that I’m in the layer mask and I’ll select the brush tool with a 40% opacity and white in my foreground color I’ll start brushing to reveal the birds alright, now I’ll select the model layer and I’ll make a copy of it so I’ll press CTRL+J and I’ll take this model copy and put it on the top here I’ll name it Highlights and I’ll put down the fill to 0% I’ll double click on it to open the Layer style dialogue and then I’ll select the Inner Shadow I’ll change the blending mode to Screen and I’ll replace it like this I’ll change the size to 70px and I’ll press OK alright, now I’ll go to adjustment and choose Solid Color and I’ll choose a soft yellow color let me add a bit of warm to it just like this and I’ll press OK alright now, I’ll change the blending mode to Multiply and I’ll put down the opacity around 25% alright, I’ll go back to adjustment and I’ll choose Gradient Map I’ll open the gradients and I’ll change this black to a soft red color and I’ll press OK now, I’ll change this white color to a soft blue color and I’ll press OK alright now, I’ll change the blending mode to Soft Light and I’ll put down the opacity around 50% alright now I’ll make a stamp visible layer so I’ll press ALT+CTRL+SHIFT+E and then I’ll desaturate it so I’ll go to: Image Adjustment so I’ll go: to Image; Adjustment and choose Desaturate I’ll change the blending mode to Soft Light and I’ll put down the opacity around 50% and that’s it I hope you enjoyed and liked this tutorial and it was a little bit helpful for you don’t forget to SUBSCRIBE and COMMENT give it a THUMB UP and SHARE IT and you know, wait for more tutorials to come and check out my previous video to see how I created this other double exposure effect image that you can see in here alright so, thank you for watching and have a nice day
Posted in Photoshop


