Double Exposure Effect – Photoshop Tutorial
bhadra 0 Comments Photoshop
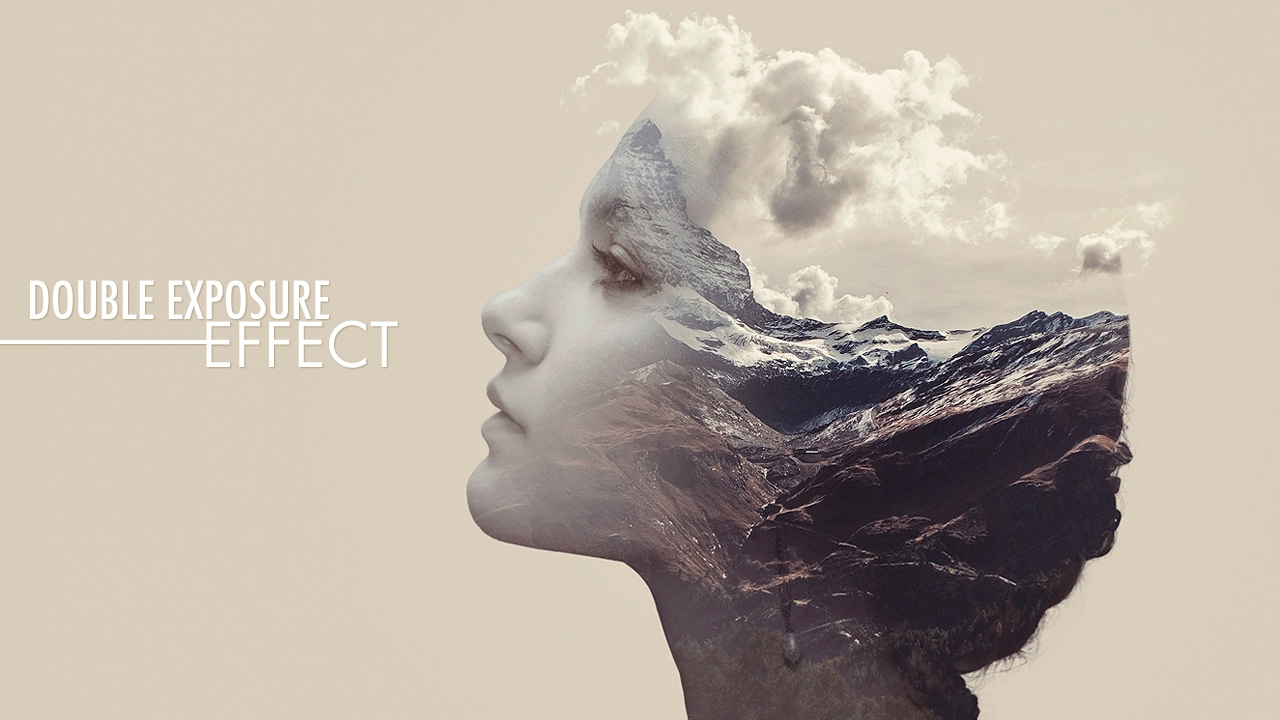
I’ll show you how I created this double publicity outcome photograph that one can find in here making use of Adobe Photoshop okay, wonderful so! LET’S GET TO IT!! Very well, i’ll go forward and open Adobe Photoshop i will take the image i will be utilising and open it in right here now I need to make a choice of the model so i’m going to go and decide upon the quick resolution software and i will make a rapid selection of the mannequin portrait identical to this after which, while i’m still within the rapid selection, i’ll proper click on and opt for feather and i’m going to put zero.5px feather in here and press adequate alright, now i’m going to opt for the model image and i’m going to press CTRL+J and now i have it in a new layer i’m going to name it mannequin let me delete this one in here okay now, I need to make the heritage of this picture better so we will have enough space to create our outcomes so i’m going to go and prefer the crop software and i will broaden it slightly bit from here and in here and i’ll click on on this verify mark to commit my change all right, now i’ll go to adjustment in here and i’ll prefer strong colour i will keep the color white for now, and i’ll press ok i will take it and put below the model layer and i will name it BG for background okay, now i’m going to decide on the mannequin layer and i will desaturate it, so i’m going to press CTRL+SHIFT+U or which you could go to: picture, Adjustment and select Desaturate now, i’m going to go and open the 2nd photo i will be utilizing i’m going to take it and open it in a new tab and i will drag it to the opposite tab in here i will title it Mountain and i’ll alternate it opacity around 50% this way i will see where I need to change it before i’ll working on it now i do know that i would like these clouds to be in the different direction so i’ll press CTRL+T and then i’ll correct click on and pick Flip Horizontal and now i’ve the clouds the place i would like them additionally i need this high of the mountain to be proper within the brow of the mannequin in here so i will press shift and drag to make the snapshot greater and i’ll substitute the image to suit where i need it and i’ll one click on on this check mark and i’ll change the opacity again to one hundred% now i’m going to decide upon the model layer and i’m going to press CTRL and on click on on it to load the decision of the mannequin now i’ll decide upon the mountain layer after which i’m going to one click on on this deposit masks icon and as you will see that this may occasionally create a silhouette of the model o.K., now i’m going to make a replica of this model layer so i will press ALT and make a duplicate of it and put it on high of the mountain layer and i’ll trade it mixing mode to Lighten and we are going to get a groovy influence in here but i’ll lessen the opacity of it round 50% now i’m going to practice a layer mask on it so i’ll go and i will one click on on this layer masks icon and i will decide on the layer mask in right here after which i’m going to decide upon the brush tool with a forty% in the opacity and the black is my foreground color and i’m going to deleting in this field okay, now i’ll select the mountain layer and i’m going to be certain that i’m on it layer masks and i’m going to begin deleting in right here to disclose the face of the mannequin o.K., now i’ll decide on the BG layer and i will double click on on it and i will sample a colour from right here and i’ll press good enough now i’m going to pick the mountain layer and i’ll press CTRL+J to replicate it after which i’m going to take the layer mask and delete it and i’ll exchange it mixing to Lighten and as you will see this will create a fab result with the clouds however there are nonetheless different section from the photo noticeable so i’ll observe a black layer mask on it via protecting ALT on my keyboard and one click on on this layer mask icon now i will choose my brushes and with white as my foreground color and i’m going to begin brushing in right here to make handiest this a part of the clouds obvious o.K., now i’ll choose this high layer and i’ll go to adjustment and pick strong colour and i’m going to opt for a smooth red color and i’m going to press ok i’m going to exchange the mixing mode to Multiply and i’m going to set the opacity around 20% now i’ll create a stamp noticeable layer so i’m going to press ALT+CTRL+SHIFT+E and i’ll desaturate it so i will go to: picture, Adjustment and decide upon Desaturate i will change the mixing mode to tender mild and i’ll put down the opacity round 30% and that’s it.
Posted in Photoshop


