How to make your photos LOOK BETTER FAST! Photoshop Tutorial
bhadra 0 Comments Photoshop
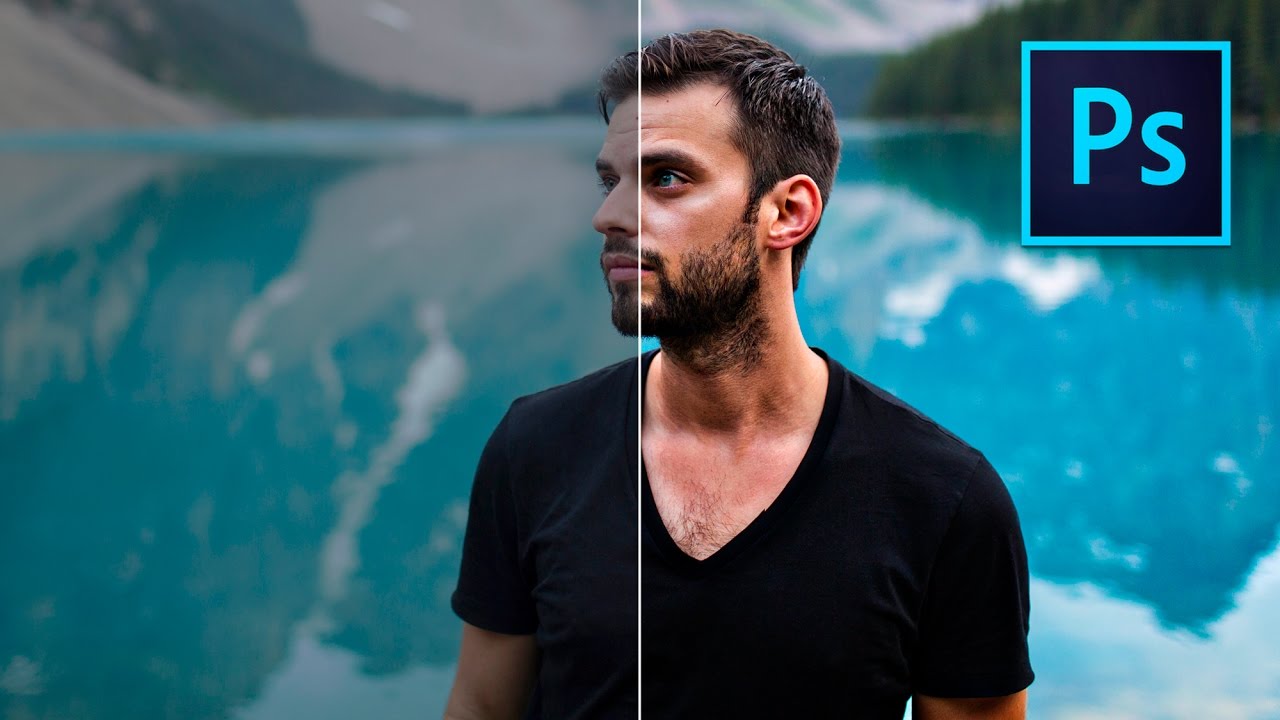
What’s up all people Peter MacKinnon here and in these days we’re talking about how you can make your photos appear higher rapid k so you don’t while you get house somewhere you’ve gotten been taking pics perhaps vacation perhaps trip striking out with neighbors and also you load that picture to your laptop and you’re like oh this looks so just right throw it up on the social facebook Instagram folks are double faucet and that IG hearts are flowing and you are just feeling just right about yourself in a position for sunset and it can be simply so beautiful and then there’s sometimes you get house and you open that photo up in your computer and you’re like I bear in mind this being means higher after I was there promise so these are some normal enhancing knowledge general enhancing capabilities that you can do on your photographs at residence at any time utilizing Photoshop i am using Photoshop CC so go forward head over to Adobe and download the trial of that or sign up for his or her subscription base to service which is what I do and also you pay a monthly rate to essentially possess all of their apps that’s what I advise we are able to take an earthly photo that appears like this and turn it into anything that appears like this in generally like 10 minutes might be even rapid for those who do that thing on a everyday basis like I do ok so we have now dragged our photograph into Photoshop and here we are we are hit with the digital camera uncooked plug-in that pops up and says good day this can be a uncooked file what do you want to do you want to simply open the picture as is do you need to tweak it just a little bit right here with digicam uncooked after which open it and that is where you might say to me Pete good what is the change between modifying and doing the whole thing you are about to exhibit me in Lightroom alternatively of making use of Lightroom and Photoshop we’re utilizing camera uncooked and Photoshop yeah you are able to do everything in Lightroom you can do everything in Photoshop it is all about workflow what packages you adore higher i like utilizing them each picture stores more of like a photograph manipulator the place that you could i don’t like that man’s face i’m going to put his face on his face fine for that style of thing but i love using them both along side one a different and i’m going to exhibit you ways I do it proper here would not take lengthy do not be apprehensive or like oh this is 10 it is intense if you happen to don’t pay attention but no we’re going to rip via this so digital camera raw i’m simply going to tweak the exposure carry up the contrast somewhat bit spotlight you’ll be able to see in the mountain there on the high I drag them all the option to the right they blow out if I bring them all of the way down it can be just a little too dark but i am completely happy kind of just just a little south of the middle their shadows i’m nice with you will find fairly only impacts that t-shirt we drag them the entire approach up however I do not need I do not need it to be this proper it can be just a little bit weird slightly bit awkward if you’re going to i’ll drag them up to like 25 will likely be half will meet in the core the white i am completely satisfied with the whites the black that is good the readability I consistently prefer to tweak somewhat bit due to the fact it just defines all those edges and particularly sharpens the picture well straight into Photoshop the vibrance we will up a little bit bit just a little bit extra saturation and then seeing that of these clarity changes we simply did that typically darkens the snapshot you could need to go back and simply bring that publicity up fairly after which we will hit open snapshot ok here we’re the very first thing I on the whole do with the image is clean up any dirt on any person’s shirt or if they have got unhealthy skin I generally go over their dermis with a brush software like this Spot healing Brush that sort of factor and in case you watched my tutorial on how to drift things to your photos this is the equal brush that i’m using and i’m just clicking to eliminate any dirt or specks that is simply brush over right here on the left facet correct beneath the color picker and it’s just like seem you clicked on so you could variety of unpolluted up any spots that you wish to have to delicate over with this brush now often in the event you had been to click on something too large like let’s consider I made this brush measurement massive and click that you may certainly see the define of the circle so you do not want to do this if you want to do away with this little pink mark here you would be at an advantage hitting s which offers you the clone stamp you hold down alternative pick the field you need to clone and then you definately click too in that field over and i’m comfortable with mainly simply that right there he’s got excellent epidermis as it is so i am in a position to move now with Photoshop you never need to simply edit the backside layer and just start taking in your layers and layers an hour goes by using you crushed an complete pizza and you then recognize to your self Oh his eyes are just a little bit too dark and return and change that you’re like whoops sorry you flatten that photograph and bake these edits into that into that photograph like 38 minutes in the past there isn’t any going again however for those who do everything on layers that you could perpetually delete a layer return delete what you did tweak that layers adjustments trade the colours so that you perpetually wish to work in layers now i don’t simply duplicate the background I shift option command n goes to give you a new layer and then what I do is stamp seen layer on high of that sounds crazy already right but hold on shift alternative command e paste that image into the new layer we simply made instead of simply duplicating a layer if I’ve made a bunch of edits to a layer that is replica it to copy those edits with it I do not want that I just wish to clean start so i will manipulate that after which combination the whole thing together that does not make feel rewind watch it if you still rebound and watch it doesn’t make sense do a shot come again it is going to make sense okay i will begin by sharpening the picture and by way of doing that I through blurring the snapshot first sounds counterintuitive sure however for this reason you are going to head over to filter blur Gaussian blur i have it preset to five so set your radius of 5 hit ok alternate the blending mode down right here for your layers panel to discontinue light oh seem at that it appears heat it looks extra punchy it already looks cooler however yeah I realize it’s blurry you are like why would I simply wish to just break an image to take a look at and make it higher oftentimes you got to set whatever free to what’s the equal you bought to let it you acquired to let it go to make it come back or when you can help you adore it set it free what it’s not relevant altering the opacity to 50% hit enter k now if we use that little eyeball they are obvious and invisible you’ll find the way it’s warmed his skin up it can be type of brought just glow this best tender aspect to it soothing comforting if you will and we will see that with the aid of just clicking the eyeball on and off now is where we will sharpen it so again i will shift option command n for a brand new layer shift option command E to stamp that layer on top and i’m going to desaturate this because i do not want to have an impact on the colors when I’m sharpening it I simply wish to have an impact on the lightness in the darkness even as i am sharpening it so shift command U is going to take all that color proper long gone change that mixing mode to overlay you’re going to go oh my goodness Pete what this looks like a scene from the Croke what is that this nonsense heading on with me right here go as much as filter different we will run a high move on it what just occurred i do know magic you’ll be able to see that weird crow like filter simply vanished and now now we have something that appears just a little sharper you’re going to hit ok now let’s zoom in to his face right here take a seem at what’s occurred if we conceal that it’s blurry we unhide it it’s sharp now if we unhide that and unhide this you’ll see the colors have not simplest been pumped up a bit bit in saturation however that skins first-rate and delicate and now it can be sharp and we zoom out and it can be watching lovely good gosh darn it if you want to double these effects if you want to say you know what I would use a little bit more of that sharp reapeat or I just like the dermis to look much more dreamy hold down command opt for both those layers drag them down to this new layers tab and that is going to replicate the layers with all of the effects now that is too powerful for me so while those two layers are nonetheless good while they’re still selected even consider of what to claim there trade your opacity to some thing suits your your fancy i’ll go down to like 20 i do not want to particularly over exaggerate duplicating those results but simply enough that it offers me a little bit little more ok what do we do now Pete good it would use some heat it can be now not winter time proper now in this image but it’s watching slightly too cold so we’ll warm the image up and we’re going to do this by using you guessed it shift command shift option command and new layer after which we’re going to shift delete that’s going to convey up the content material mindful box and you are going to hit colour under content material which then opens up the color picker i’ve orange selected there is the hexadecimal code if you wish to see that F 5 7 9 zero zero that you can plug that into the same spot and you can come to be with the identical color orange that i am utilizing however it all relies on the photo you’re modifying so variety of does not subject hit adequate hit good enough once more and now you’ve it looks lovely a first-rate stable pumpkin looking image entirely orange exchange that blending mode down here to soft light and now it looks a little bit higher it nonetheless appears like he has jaundice and matters are going bad we’re going to change that opacity to love I don’t know probably like 15 and say 15 is like a excellent spot probably perhaps 13 I wanted to go 10 but then 16 so thirteen in the center of appears like i’m pleased with that so now that looks hotter so let’s disguise all of those and spot what we now have completed see the way it’s looking better already with now not dangerous now what if I desired to make his eyes brighter or make the mountains within the heritage darker seeing that they’re a little bit too washed out or his eyes and i appear a little too darkish due to the fact of all the sharpening and the saturation that now we have delivered with the Gaussian blur we’ll just how you are going to do this you’re going to make a new layer shift option command n you are going to stamp that noticeable on there and you’re going to seize the last suit instrument keep command down get plus for your keyboard that’s going to zoom in for those who keep spacebar this is a little hand pop-up and you should use that hand to move the picture round command + again to zoom in and we’re just going to opt for the iris i don’t need to make the whites of his eyes too brilliant since then he’ll seem like someone from the walking useless so after we selected that you’ll be able to see that little determination of what is called marching ants that means this discipline is chosen you maintain shift you’ll be able to see a little bit plus pop-up beside the lasso lasso lasso lasso some thing prefer the opposite eye be very careful not to go too much into the skin nevertheless it’s k and now we’ve received both eyes selected now you are going to return down here and make a new adjustment layer with brightness and distinction click on that now if we up that brightness you’ll see simply the eyeballs are becoming brighter now that’s terrifying that straight up looks like a zombie if we zoom available in the market until I mean if that is what you’re going for you’re executed however now not not right here we’re just going to up that just a bit bit I do not want it to be too apparent if you happen to brighten any person’s eyes up is far too much persons understand and it appears that it’s like oh that man had some fun in Photoshop we don’t want that we want it to be subtle the extra subtle edits that we apply to this only a extra unique it’s going to come to be eventually so i’m just bumping that slightly proper there it is first-class 24 for me i am just right to head with that now we will make a further layer again and what i will do with this deposit is darken these mounds within the heritage same thing shift option command and shift choice command II I believe like I have to keep saying that in case folks are tuning in or zoning inside and outside so i’m sorry and that i just say sorry previous given that i am Canadian in half of considering that i am sorry but anyway let’s get back to this what you’re going to do is once more with that final new software you’re simply going to draw a line along the waterline over his head over the bushes identical to this up that border of the image across the highest and across the left part back down proper there happy with that now we have now received our decision right here equal thing adjustment layer curds this time now we will use this curve and we will bring down that brightness so we will crush it right here much more – we pointed out making that s curved when utilising curves but correct now I simply wish to make it darker however in doing so it simply made it relatively blue and like I stated we’re looking to get rid of it feeling adore it’s iciness considering it’s the middle of summer time on this picture a good way to change from RGB to red Channel after which we can push extra Reds on to end now we don’t want to appear like Mars so we’re simply going to tweak that rather just a bit bit i am completely satisfied with that it is a bit of too purple it is good proper about there again i am trying to be subtle with this and we’ll close that now when you consider that it’s an adjustment layer we will hit B for our brush instrument close bracket to make that somewhat bit smaller after which we are able to paint away that harsh line correct there we’re simply going to paint over that part and do away with that harsh line in view that that does not seem good and then i will drop the opacity of this entire thing to like 60 now if we conceal that layer you’ll see what’s occurred it is just sincerely drops the brightness and the distinction in the prime of the mountains and just variety of outline them a bit extra they received lost and that i desired to bring them again into focus and that’s sincerely accomplished through doing that now the final thing you are able to do is shift option command n shift choice command E after which that you could desaturate this once more and that is simply if you wish to have slightly more contrast and temper on this photograph which I like to do in my shots however will likely be saturated with shift command U after which i’m going to change that mixing mode to overlay like we did proper earlier than we delivered the high-cross filter however now i’m simply going to drop that opacity to love I don’t know 15 i will preview see what that does for me it simply provides just a little extra angle i am completely happy with this it would just use a slight overall bump in brightness so the final factor that is the final layer we’ll add here i will add an adjustment layer for curves and i’m simply going to take the backside here and bump these curves up just a little little bit simply ever so moderately now not making a colossal deal of it that is it i will opt for that prime layer i will maintain down shift and i’m going to click the bottom layer proper above the history i’ll hit command G it will staff all of our edits together and we can double click on that and title it edit and now after we seem at this photograph if we just hide this layer that’s what we started with after we adjusted it within the digital camera uncooked plug-in on the starting now it looks like this so i will flatten this photo only for instance sake and then i will deliver in this digicam edit once more so you will see it but i’m going to reset we’re going to go back to default to what it gave the impression of i’m going to open that image i’ll reproduction it close that window and i will paste it onto this and that could be a beautiful correct illustration of what the picture appeared like coming out of the camera and what it appears like now after we have applied our edits once more that is all personal preference you might no longer like your portraits as distinction being a punchy or to pop as much as this and that is the fantastic thing about being photographers and artists and enhancing is you could make it seem nonetheless you want it to look and the extra that you just stay steady with that style the extra it becomes your form and individuals begin to select up on shots that you are taking without even realizing you took them on the grounds that they say whats up that looks lots like how piece pics seem very peter McKinnon and it can be quite cool to start seeing your own sort improve so if this can be a cup of tea there isn’t any worries with you could mess around with all these settings form of follow the identical general steps and provide you with some thing your self that appears lovely similar it appears utterly distinct the whole thing’s okay but we went from this to this and i’d say that is a lovely nifty little edit and now not so much time so that is it guys thanks so much for gazing I quite respect it when you liked this video hit that like button drop me a comment below let me understand what you notion i really like hearing from you guys and interacting and i will see you in the subsequent tutorial or the next vlog whichever comes first
Posted in Photoshop


