Pixelated Effect – Photoshop Tutorial
bhadra 0 Comments Photoshop
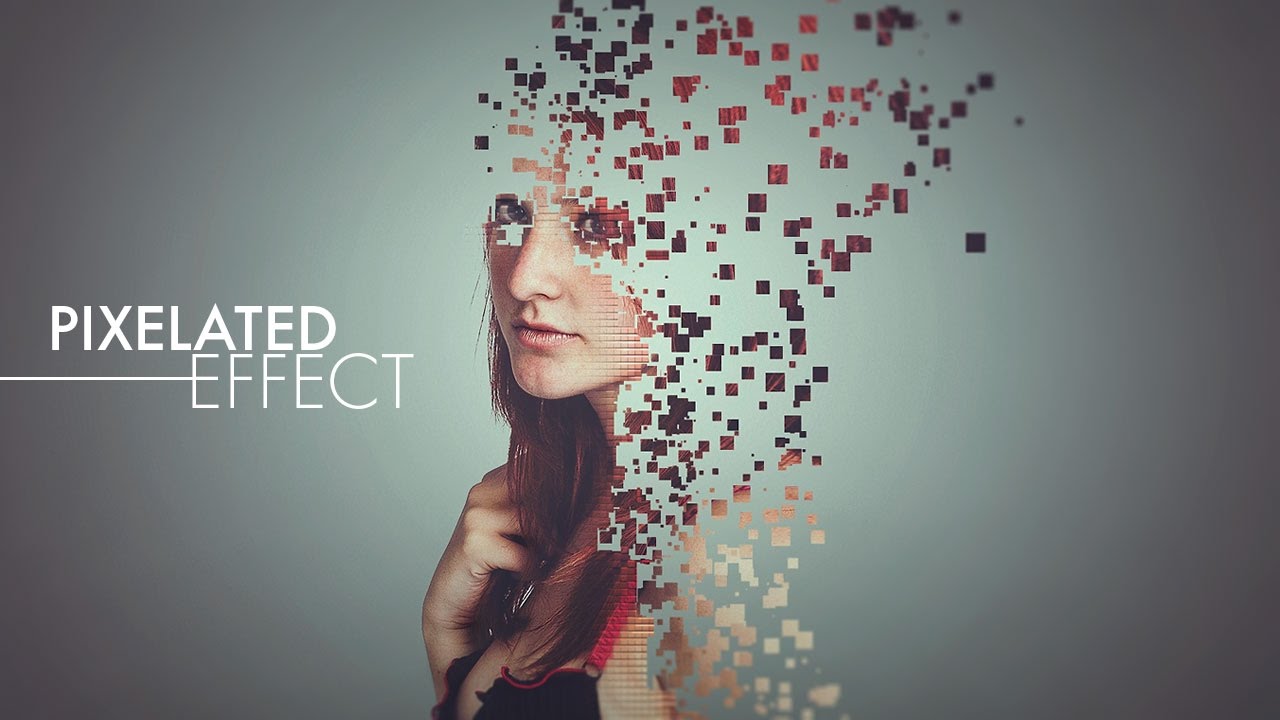
Hello everyone, in today’s tutorial we’ll see how to turn an image into this Pixelated effect that you can see in here using Adobe Photoshop and as you can see these are other examples I created using the same technique alright so! LETS GET TO IT!! Alright I’ll go ahead and open Adobe Photoshop and I’ll take the image I’ll be using and open it in here now I need to cute the model from this background but since we have a light grey background almost white it would be perfect to apply a Level adjustment layer just to make it easier for me to create a selection so I’ll go to adjustment down here and I’ll choose Levels I’ll darken the midtones by taking this slider and put it around here as you can see this will make the whole image darker so I’ll take the whites and I’ll increase it a little bit just to make the background whiter and this way it will be easy to select alright, now I’ll make sure that I’m selecting the level adjustment layer and then I’ll choose the magic wand tool in here and I’ll one click on this background to load a selection of the white only and now we have the background selected but I need to inverse it, this way I will have a selection of the model only so I’ll press CTRL+SHIT+I on my keyboard or you can go to: Select and choose Inverse right here I can delete this now alright, now I’ll open Select and Mask this would be the refine edge in case you are using and older version of Photoshop I’ll select the refine brush and I’ll start improve the selection of the hair and I’ll press ok now I’ll one click on this layer mask icon to apply my selection and I’ll convert it to a smart object so I’ll right click and choose “Convert to Smart Object” right here alright, now I’ll create a new document so I’ll go to: File and choose New in the width in here I have 1920px and the height 1080px 300 in the resolution and RGB in the color mode I’ll click OK alright, now I’ll take the model image and move it to the other document using my move tool (v) I’ll press CTRL+T to scale it I’m holding the SHIFT and ALT on my keyboard to keep the image propotion I’ll place it right in the middle in here I’ll hold shift to make it bigger a little bit just around here and I’ll click on this check mark to commit the change alright, now I’ll select the Background layer I’ll double click on it this window will pop up because it was locked so I’ll name it BG for background and I’ll click OK to unlock it I’ll go back to the background layer and double click to open the layer style dialogue I’ll select the Gradient Overlay and I’ll open the gradients in here I’ll double click on this color stop I’ll choose a soft grey like this I’ll click OK and then I’ll double click on this other color stop I’ll choose a very light grey like this I’ll click OK and OK next, I’ll change the gradient style to: Radial and the scale to: 120% and the Angle to: 135 I’ll click OK alright, now I’ll make two copies of the model layer so I’ll press CTRL+J two times 1 2 and I’ll name them Pixel 1 Pixel 2 and Pixel 3 alright I’ll hide the pixel 3 and 2 layers for now and I’ll select pixel 1 layer I’ll hold ALT and I’ll one click on this layer mask icon to apply a black layer mask as you can see and then I’ll open the properties panel if you cant find it just go to: Window and click on Properties alright, I’ll put down the density of the layer mask a little until I can see a bit of the model like this alright, now I’ll select the brush tool and then I’ll one click on this dropdown to open the brushes and I’ll one click on this gear icon right here and I’ll choose basic brushes I’ll press OK so I can replace my current brushes now I’ll go back to the gear icon again and this time I’ll choose Square Brushes but this time I’ll click on Append so I can add them to my current brushes as you can see we have now the basic and square brushes alright, now I’ll select one of the square brushes and then I’ll open the brush presets if you can find it just go to: Window again and one click on Brush right here or you can use the keyboard shortcut F5 alright, I’ll change the spacing around 120% and then I’ll select Shape Dynamics I’ll change the size jitter to 100% next I’ll select Scattering I’ll put a check mark on Both Axes and then I’ll change the scatter to 1000% and I’ll close it alright now I’ll make sure that the opacity and flow are both set to 100% and with white as my foreground color I’ll start brushing like this right in the center in here I’m using the right and left brackets to make the brush smaller and bigger alright, just to get something like that now while I’m still on the layer mask I’ll open the properties panel again and I’ll bring back the density to 100% alright now I’ll select the pixel 2 layer and make it visible and then I’ll go to: Filter and choose liquify I’ll select the Freeze Mask Tool right here and then I’ll brush over her to freeze this area this way I can apply the liquify filter without affecting this freeze area in here now I’ll select the Forward Warp tool in the top here and then I’ll warp this part like this and I’ll click OK alright, now I’ll apply a black layer mask by holding the ALT key again and one click on this layer mask icon and again I’ll open the properties panel to bring down the density a little bit so I can see where I want to brush exactly alright, now I’ll start brushing using the same custom square brush just to get something like this now I’ll open the properties panel again and I’ll bring back the density to 100% alright, now I’ll select the pixel 3 layer and I’ll make it visible and then I’ll apply a white layer mask this time by one click on this layer mask icon without holding any key and then I’ll open my brushes from here and I’ll choose a regular square brush with black as my foreground color I’ll start brushing to delete from the edges like this by just clicking like this alright, just to get something like that now I’ll go to: Filter Filter Gallery and in the texture folder right here I’ll open it and choose Patchwork I’ll put 4 in the Square Size and 6 in the Relief but feel free to change this numbers to get different result and I’ll click OK now I’ll select this white smart filter layer right here and then I’ll open my brushes and I’ll choose one of this basic rounded brush in here I’ll change the opacity to 70% and with black as my foreground color I’ll start brushing to delete the patchwork filter from here but I’ll keep a little bit on the edges just to create that pixel transition look alright, now I’ll create a new folder on top and I’ll name it Adjustment this folder is optional you don’t have to create one too I just like to put make it this way I can see the before and after the adjustment alright, now I’ll add a Gradient Map from here and then I’ll change the opacity first to 50% and the blending modes to Lighten now I’ll one click on this gradients you’ll find a link in the description where you can download these gradient I have in here just one click on this gear icon and choose replace gradients and load them alright, I’ll pick this one right here and I’ll click OK now I’ll add another Gradient Map from here again I’ll change the opacity to 50% and I’ll change the blending mode to Soft Light this time next I’ll one click on the gradient to choose another gradient I’ll pick this one right here I’ll click OK alright, now I’ll add a Level adjustment to play with the colors in the channels so I’ll go to the channels and choose the Red channel to adjust the output levels I’ll take the white slider right here and move it a little bit and then I’ll take the black slider and move it a little bit too alright, now I’ll select the Blue channel and I’ll do the same thing and since it’s an adjustment layer, I can always go back and change it if I didn’t like it now I’ll go to adjustment and choose Exposure I’ll increase the offset a little bit and I’ll decrease the Gamma Correction.
Posted in Photoshop


