Why EVERY photographer should be using LIGHTROOM!
bhadra 0 Comments Light Room
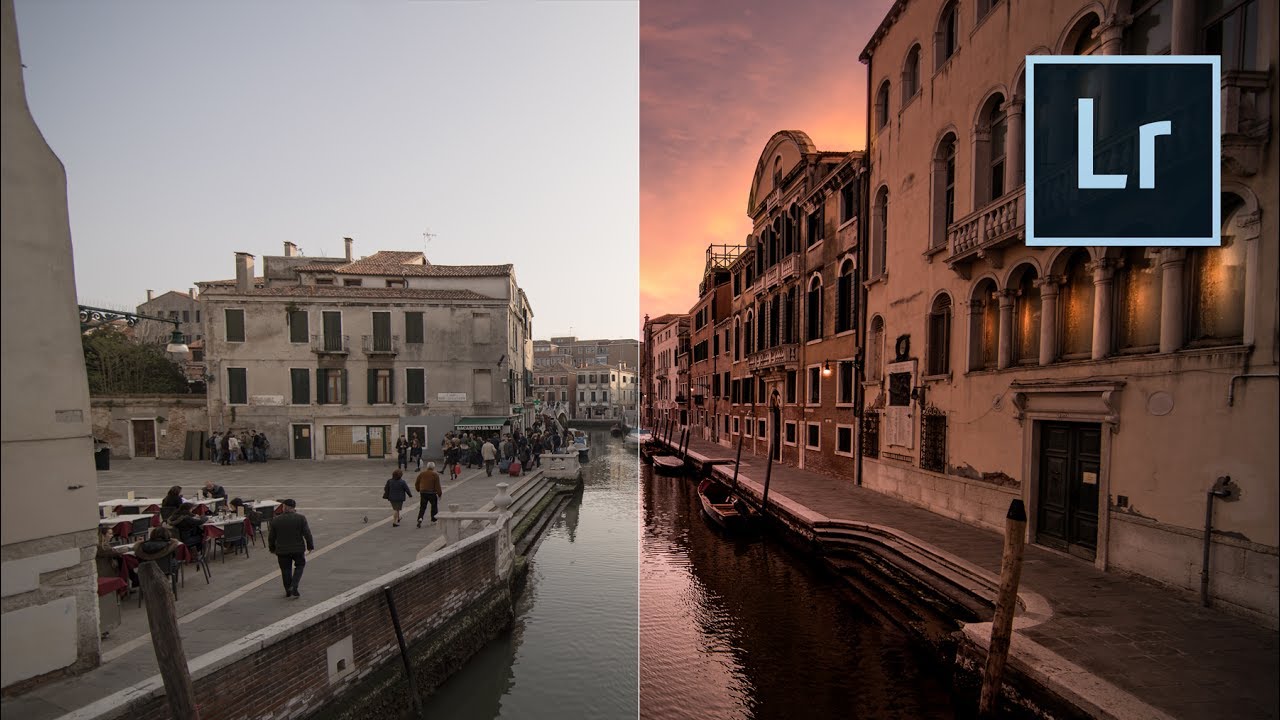
What’s up everybody to your mckinnon here and today we’re talking about why every photographer should be using Lightroom we’re going to go through some tips and tricks and techniques so that by the end of this video hopefully you’ll be just a straight savage with that camera using Lightroom alright roll that intro alright everybody welcome back to another Piotr MacKinnon tutorial so great to see all your smiling faces which actually can’t see any of them but I assume some of you are smiling and some of you probably aren’t smiling and let’s just continue with the tutorial happy Father’s Day for starters to all the dads and fathers out there all the fathers to be all the fathers come and gone and all of that you can father myself I respect the job at the title the yeah happy Father’s Day whatever hope you guys have a great day of your family and maybe grab your kids and watch this tutorial and smash the like button and that’ll be my Father’s Day gift – whatever it’s super lame I’ve done a lot of tutorials in Photoshop and in Premiere and just random stuff and techniques and thoughts and stuff like that but I’ve never done a tutorial with Lightroom before and I thought it was time that we did that it’s an incredibly powerful tool and to be honest like the more and more time that goes by the more I find myself using it and the more I discover about it the more shortcuts I discover about it and the more I start to like it and I just thought to myself you know my audience needs to know a how much I like this and B I want them to like it just as much so I’m going to run through a couple things it’s not going to be a long one today I’m going to go as fast as I can and by that I mean it’ll probably still be fifteen minutes but I’m going to I’m going to do my best as you guys can all get back to your families but Before we jump into this tutorial thank you to Squarespace for sponsoring this episode and they are of course as you all know the all-in-one platform website where you can go to get a store a blog a website and online presence they make the whole thing easy it’s an all-in-one platform so it’s all done for you there’s never anything to upgrade or install or patch they’ve got award-winning beautiful designer templates award-winning customer service 24/7 they make domains easy these guys have the web game on lock you want to save some money head over to squarespace.com slash McKinnon enter code McKinnon in check out and I’ll see you the 10% off your first purchase can get better and better at that whoo okay so this tutorial like I said is about light verse if you don’t have light room you want to pick that up because it is awesome I use Lightroom CC which is creative clouds so I just pay for a subscription and I get access to all the Adobe apps for a monthly fee I highly recommend doing that they’ve got plans for all different types of people be it that it’s a business you’re a student it’s just a creative thing maybe you just want to use one app whatever if that’s just like that’s their whole service now so they’ve got you covered so head over there and check that out I highly recommend you guys invest in that if this is something that you are taking seriously or want to take to the next level I just feel like I’m fold sound today Oh feeling it anyway so we’re gonna go over just a few tips and tricks that I think will blow your mind or help your workflow or speed up your workflow and I’m really really excited to show you now the one question I do get asked a lot is well what’s the difference between Photoshop and Lightroom both of them do a lot of the same things both of them do completely different things Lightroom handles like the organization and storage of files as well as the editing where Photoshop doesn’t so you can catalog and store and really really organize your entire photo library within Lightroom at the same time as editing those photos and stuff like that and the nice thing about Lightroom is you can always go back to those photos and since they’re stored raw you can continue to edit them and there’s no Save button you don’t have to hit save as and save as new version you just go back and reset it or keep updating it that’s the beauty of Lightroom where’s Photoshop you got to save versions but there’s a little more freedom for manipulation in there like if you want to take this guy’s face and put it on this guy’s face and put this guy on the moon and then put the moon in this guy’s garage and like that sounds crazy but you could do that if you wanted to and then lastly gonna keep doing this bugging myself and then lastly I’m going to teach you guys the best way that I crop my photos for Instagram we’re posting to Instagram and getting the best quality Instagram shops from Lightroom to my phone so that I can upload them and they look the best and the most beast-like and just tasty delicious awesome full screen rest just mouth-watering decadence get carried away all right let’s jump into Lightroom so once you’ve imported your photos they come into this section well actually they come into this section called library and they’re all numbered and you can kind of go through the thumbnails star them if you want so if you like this one you can hit five and that’s going to remind you to come back to it if you like this one a little bit less you can hit three so when you’re ready to get editing click on the developed tab and that’s going to bring you to basically the editor all your organizational stuff is on this left side here under collections and history so if you’re going to use Lightroom as some sort of archival storage and organization system as well as your editor that’s where all that stuff would go as well as your presets which by the way I am coming out with a bunch of Lightroom presets for you guys to stay tuned for that I’m just working on them and they’re taking a while because I want them to be awesome and there’s a lot we are here this is the editor everything down the right side here is the stuff we’re going to be talking about today all of your tools and brushes and adjustments and sliders everything you’re going to use to manipulate a photo is here on the right okay so to start off I mean we can choose anything right like let’s just choose this for example one of the first things I do is either white balance exposure and correction of my horizons so to get the right white balance you just click this little eyedropper and usually you can pick the whitest area of the photo and it’ll white balance to that so now we won’t just drop the highlights a little bit to preserve that sky lift the shadows slightly to give some more detail lift up those whites and this is really kind of personal preference at this point you can use clarity and what clarity does it really sharpens it up but you only use it too much because it kind of sucks the color away and it just starts looking really really bad so everything in moderation mind you I am the sort of landscape photographer that goes for lots of color and punch I like really dramatic photos so for me I usually go a little bit further than I would if it was like a portrait for example and these are your base that’s your basic panel so you guys can play with that it’s pretty straightforward what I want to talk about is the hue saturation and luminance tab which is down here HSL so this is like think of it as all the individual colors that are in your photo you have control over each and every one of them so if I want this water to be more teal let’s take a look at this for example I can down here to where it says aqua and blue because those are the colors I want to manipulate and I can change the color if I don’t want it as aqua I can drag these to the right that’s going to make it more purple but maybe I want to accentuate that aqua so I’m going to bring them back down to the left and really make them look aqua but that’s a little too far so it’s finding the right balance with your HSL sliders to get the most out of the photo that you’ve taken now a good way to do that is to click this little target and that opens up a selection on your on your cursor where you can click and drag one way or the other way and what that does is takes the colors in the exact target area that you clicked on and just manipulates those when you’re dragging your mouse right or left so that’s a really good way of doing that so down here in the grass where it’s green I can click on that and it’s now going to move the green and the yellow slider it’s not going to affect the purple or the pink in the sky so that’s the HSL slider so if we want a little more warmth if we want that aqua to be a little more aqua to make it feel like it’s a tropical place we can drop that down if we don’t want the sky to be as blue we can get rid of that as well by going over to luminance so we can take the brightness of those colors and affect those so for instance here’s blue if we want that blue to be brighter we obviously drag it up if you wanted to be darker we drag it down so we’re affecting the brightness of those colors color themselves we can strip or add more up so in this instance again we can come over to aqua and we can make the saturation of that aqua higher by dragging saturation and then we can drag the luminance of that aqua higher if we want it and then we can change the hue of that aqua if we wanted so coming over here and playing with the HSL tabs hue/saturation illuminance is a great way to really get the most out of your photos we come over here to my friend Maddie so to bring down the exposure to make it a little more even but now the photos a little bit dark so here’s the next tip come over here to the masking brush and this masking brush lets you paint on different settings essentially so let’s say we wanted the exposure to be higher notice that we’re dragging this tab right now nothing’s happening but now if we paint we’ve just painted exposure onto the subject and now that that area is selected based off this little target dot that you see here we can continue to change that we can make it super bright you can see where I painted or you can bring it down darker so you can really affect just one area if I want to bring him up a little bit they can sharp or using clarity or using the sharpness or changing just his color to make them a little more red or making a little more blue we can do that by using this brush tool to paint in different areas to bring up the darkness and someone’s eyes to bring out the white and someone’s smile to paint a more exaggerated dramatic sunset now that we’ve just done this we can come over here to new and it’s going to reset our brush so let’s say I want the exposure now to be darker contrast to be higher blacks to be down White’s to be up shadows to be a bit more deep now when I paint it’s going to put exactly those settings into my brush you know it’s obviously overkill but now because that area is selected we can go in we can change the exposure of it if it’s too much we can make it more blue if it’s not blue enough we can make it less blue like that actually looks pretty cool we could bring the clarity up of the sky we can bring the contrast down of the sky or we can bring it up higher so you can see if you can really affect different areas of the photo and if we ever want to get back to a previous masking brush we just click on the target dot and now that area is selected or we come back over here and click on that target and that area is selected so that’s the masking brush you can use it to completely brighten up a photo as an example this photos a little bit dark we can go over here to the brush bring up the exposure and we can paint some new light into this entire photo and now we can bring up that brightness another really cool thing is if you if you select the circle here and let’s zoom into a photo we can draw an oval over this box position it right here change the brightness if we want let’s make it really really yellow let’s bring the contrast up on it bring the blacks down that kind of thing and then we can right click and hit duplicate and that’s going to duplicate the same thing we can move it over to this window and then as an example when we hit done and we zoom out that looks like the lights are on now that’s a super exaggerated horrible horrible hack job of doing that but I do do this all the time here’s a picture from yesterday that I posted on Instagram here’s the exact same photo I used all the HSL sliders I painted in new light I use that oval as a means to turn all of these different lights on that otherwise didn’t have lights on before but it just adds so much more light to the photo and it’s that easy to do in Lightroom here’s another photo for example it’s on its sides you’re going to hit command in the left bracket and that’s going to straighten it out now there’s also all your tone curves are down here so if you want to make this more vintage a classic look to do that is to lift the black so and then we’re going to drop those mid-tones back down and we’re going to even out that line and then we’re going to adjust that slightly perfect come down here to our few saturation we’re going to take those greens make them a little less green bring up that saturation slightly a little bit of luminance then come over here lift the shadows slightly add a little bit more contrast a little bit more clarity we can even make the feel of this shot a little more more on the warm side and there you go again we can come down here scroll down and hit enable profile Corrections you can see it brightens up those edges select the lens that I was using which is the 70 to 200 to eight how do we export it for Instagram so that looks the best now you’re noticing a trend on Instagram right now where all the shots are big fat vertical pictures because you want to take up as much real estate on Instagram as you can to drive the most engagement so for instance here’s my account right here that picture is a big fat photo so what’s the best way to do that well if you come into Lightroom and you click on this crop button you’ll see aspect original you’re going to click on that and go enter custom and that size that you’re seeing everyone post on Instagram including myself is 5 by 4 so change that to 5 by 4 and hit OK you’re going to see a new crop so this little outline box right here is 5 by 4 so now we have to choose where we want the photo let’s say we want it right here we’re going to hit done at this point you’re going to go over to file export make sure everything is on the highest quality come down here make sure that’s at 100 because a lot of the time it’s not we’re going to export this to the desktop so hit export once that’s finished come over here right click hit share airdrop if you’re on a Mac my phone is going to pop up boom and you’ll see now my phone is going to get this image and it’s that easy now I have a super high quality version of this photo on my phone straight from Lightroom that I’ve used to edit perfect for Instagram I’m ready to upload no quality loss lots of real estate well good to go now for some super fast tips and shortcuts to round this thing off check this out when you’re sliding any of the sliders on the right side hold down alt let’s do highlights for example when you start sliding those everything that you’re seeing on the screen right now is showing you what is overexposed so if you bring that all the way down to when there’s nothing on the screen and let go that is where nothing in this photo is blown out same with exposure you hold down alt and you bring that up that’s all the stuff that’s blown out so that right there is a perfectly exposed photo next tip hit F on your keyboard boom that’s going to give you a full sized screen preview of whatever it is that you’re looking at you hit em again and you’re brought back to this menu which is amazing next tip hit Y Y is going to show you a side-by-side comparison of before and after if you want to take that to the next level hit shift Y that’s going to give you a split before and after of the same photo you want to get out of that just hit Y we’re back so that’s it for me guys I hope you guys enjoyed this video happy father’s day and as a special gift to all the dads out there who are wanting to check out some presets for your videos or your photos my Luntz pack today is 40% off so link is in the description head down there click on it sales done you’ve got to Add to Cart so 40% off thank you so much for your support I hope you guys have a great day hit that like button if you like this video subscribe if you aren’t already and I forgot to say you are free to smash that like button should you so desire I am headed out of the country tomorrow I’m not headed no I’m headed to the other side of the country tomorrow so it’s going to be good I hope to have lots of vlogs to you week and a couple random tutorials that I’m not even sure if they’ll work out but I’m planning to try so stay tuned to the channel lots of fun stuff coming I love each and every one of you hope you guys enjoyed that now go edit some photos and I got nothing I’ll see you guys the next video
As found on Youtube
Posted in Light Room


