How to Easily and Quickly change a Sky in Photoshop CC 2017 Tutorial
bhadra 0 Comments Photoshop
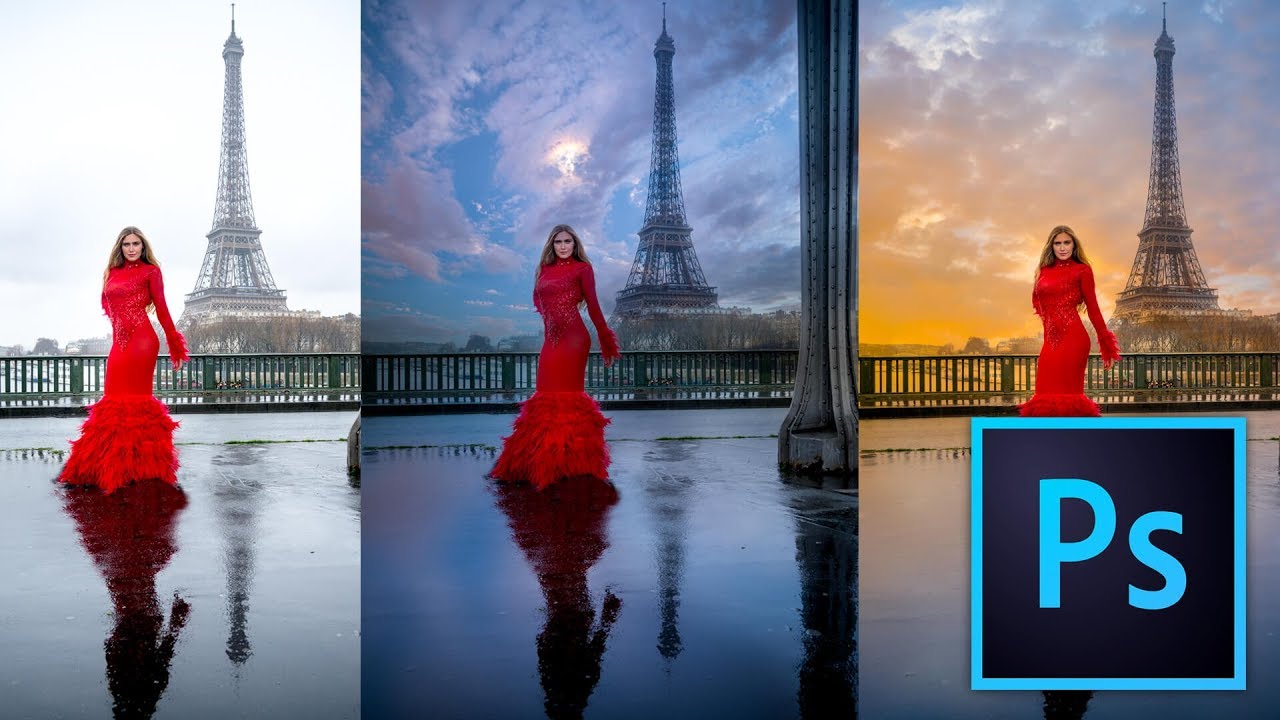
I will tell you a quick and easy way to change sky at will on your photos Bonjour Madame Minister my name is so many I’m a French for the weapon from the amazing the beautiful city of Paris France and I live in Los Angeles California I make one to two to three weeks click here if you’re not subscribed to my youtube channel so you get a notification every time a new video comes out alright let me show you in Photoshop how you can change sky at will alright I want to shoot one of the most easy way there is to change sky and that is to use the multiply blend mode now for this to work you need a photo with a very wide sky and you need to make it a little too overexposed like this photo this is a photo that I shot for my good friend natinal creature an amazing designer that was a model that we were in Paris with by the Eiffel towel but you know the sky was where I was actually pouring rain and she was just under the bridge so that the water was not getting to her but you know it’s a good photo but I wanted to see if I could add more drama so what I do here is I have this guy that’s open which is very blue and this one that’s kind of more yellowish let’s try with the more yellowish one and so I’m going to use the move tool and drag and drop it over the photo so here is my sky I want the Sun to be the other side so I’m going to press I’m going to go to edit free transform or I can press command T I’m going to right click and I’m going to go flip horizontal to have the Sun here I want to position it here now here is the the few step you do step no.1 position your sky right at your isin so here is a risin then I’m going to take my sky and I’m going to duplicate it by dragging and dropping it here and then and then I’m going to press command T again so you look M&T but this time I’m going to sleep vertical okay I’m going to hold on the shift key and drag my copy and make a perfect mirror so now I got a perfect mirror of the sky top and bottom alright I’m going to select both of this guy I’m going to right click and I’m going to merge the layer so now they’re into one layer this layer I’m going to put it into a multiply mode and that’s the secret and it’s going to do most of the heavy lifting for us so multiply mode look at this it just totally blends I mean it goes here a little bit of a default all we have to fix that you can see some of the clouds a little bit in the structure here the reflection is good it’s a little strong here but overall it’s already a good start check it out before after I love the multiply mode as I said it’s going to work if you photo has a white guy or is very bright but believe me having white guy is one of the most easy thing to do in photography especially in winter in Paris okay now I’m going to take the lasso tool and I’m going to get make a very rare selection of the model and off the Peter here and of the entire bottom of the photo so now I’ve got a selection and you see here I have a feather of 20 pixel on the lasso tool so it’s a very very quick selection nothing fancy what I’m trying to do is now I’m going to make sure I’m on the sky layer here I’m going to go to filter blur Gaussian blur and I’m going to blur a lot like 100 over like 150 check it out before you see how you see all the clouds which is not very realistic and after because we blur it we can’t see the clouds but we don’t see the color of the club we don’t see the clouds themselves which is really good so I’m going to press ok and commend need to undo so that’s pretty good it’s kind of weird there but we can always do a little mask take a little brush be for brush make sure your brush is very low like you know 10 50 % and black is my for one color remember black conceals white reveals make sure the brush has a hardness of 0 so very soft brush and I can just brush away the you know the the sky from from this place here you know wherever I want to end maybe over her take a brush make sure there is no clouds on not too much on the face and but the blending is almost perfect because you know we have this blending mode of multiply now the other thing I don’t like is the Eiffel Tower that’s kind of like not weedy you know it’s kind of like too much in the fog because of the sky so I’m going to duplicate this layer I’m going to put this one on top and this one I’m going to put on to multiply okay it’s going to do something kind of it’s going to put the photo back over everything and then I’m going to press the option key and a mask to make this a black mask remember black conceals what reveal so now this mask is completely invisible I’m going to take back my brush this I’m going to put the opacity like at least at 50% I’m going to put white because I want to reveal this Ethel towel and I’m just going to paint a little bit over the Eiffel towel and the multiply mode is going to make it you know it’s going to reveal itself so that’s one sky replacement let’s try another one so I’m going to put this one into group and I’m going to call it sunset okay and let me just redo it really quick but this time with a night feeling so I’m going to same thing I take the move tool I take the sky over I put it here command key so zoom out a little bit command key I’m going to make it smaller make it go on the horizon like this I like the idea of the moon that’s over her so it’s actually a sky a shot in LA a couple of days ago I’m going to duplicate the layer press command T right click flip vertical shift to make it stick okay I’m going to settle is the same thing I’m going before I’m going to merge the layer I’m going to put it into multiply mode boom check out the drama now same thing here we got too much of this I’m going to shoot out the technique so you can go here and you can take the quick select tool make sure you are in the photo itself I’m going to make a selection of the Peter I’m going to make a selection of the entire bottom of the photo and a selection of her really quick and then I’m going to go back to filter and this time I can just use a sympathy that I had before you see it’s in memory Gaussian blur and boom sorry command Z I made a mistake I should have been on the sky cloud layer some go to redo it and I’ll show you that miss sexy you don’t do something and boom well ow and so it’s pretty good there we still see a little bit too much just make sure you do a mask you know same idea a mask with black as a full round a low-value when you do that use a low-value and I can mask out here to make sure it’s not there is no clouds on the pillar and you know if you think it’s too much here you can even make bright points you can take it out on her face so it’s not on our face even make her dress and voila so and same idea I can get a hotel to let me see if I can use the same layer that I had before this one just this one I’m going to take this one out for the Eiffel Tower is it yeah it’s doing a great job so basically so that’s you see how fast it is and it’s so fun to do so that’s one version like you know very blue moon and that’s another version very sunny and voila so this is a really quick way to do a scary basement now I have if you like Photoshop I have a new course that just came out it’s a very short course it’s one half hour it’s called Photoshop QuickStart let me show you what it is what it is is where fur is going to go into Camaro and I’m going to show you all the things about Camaro to make your photo really pop using Camaro then I’m going to show you a whole bunch of Photoshop trick like how to change the sky but that’s a little more advanced how to change the sky and put the sky on the photo very similar to what we did but it’s a little more advanced technique how to retouch the skin that’s the before that’s the after with you know using frequency separation how to take somebody in the studio and boom put it on a photo like this how to erase anything in Photoshop.
As found on Youtube
Posted in Photoshop


