Photoshop 3D Manipulation. Creative Pop out Manipulation tutorials in 2019. iLLPhoCorPhics
bhadra 0 Comments Photoshop
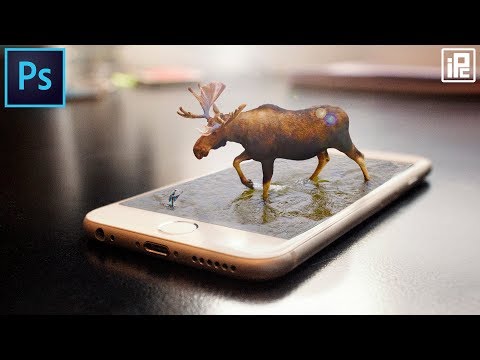
Hello everyone welcomes to illphocorphics now today starting and nother exciting adobe photoshop tutorial for you today I’m gonna show you how can you create this awesome 3d pop out composite in Photoshop and I’m gonna show you all these things step by step so that they can learn and you can also, create your own 3d composite in photoshop and if you’re new welcome make sure to subscribe also press that Bell icon because I’m going to come back more exciting adobe Photoshop tips tricks and tutorials for you so without any further let’s jump your Photoshop now are you the magical world of Photoshop you can see this image and I’m going to use three different images this one this iPhone image and the moose image and also that Kingfisher image, I’m going to combine into one now to do this one this is perfect now next thing just take this most image this one and unlock this one click this lock here if you unlock then select take this one and come here and paste it here now it’s okay now press ctrl or command T it will come up the proportion now press right button of mouse and change it to horizontally now we need to change it to horizontally now the next thing make it as smaller and just click and drag here each local automatically make this one is already smaller and if you’re using CC less than CC 2019 into place shift before click it here or because it’s not going to remain the proportion I’m using CC to the nineteen so I didn’t need to be press shift to maybe some bigger or smaller and if everything City let’s this is it is imagining you press shift now makes a little bit smaller like this one and a little bit more around how about this one and I think this is perfect and this is OK for me mm it’s close and I think pasted sure and this is great now we are done the next thing would just select this most to select the mode it just call this quick quick selection and take the quick selection if you if you want to use pen tool if or if you know how to spend it in this case I’m ready prefer you to use pen tool now and for this tutorial is for beginner and my most of the viewer I began and so that’s why I’m making this one for beginner just using quick selection and click and Derek you can see it’s automatically selecting this here and it’s okay and just you can see we just straining back this one again just click and drag it will automatically select your this one this area whatever the area like to select him down go to here and also select and press this one and now we need to remove this area you don’t want to select this area to sit and select this one just press alt or option you can see them – here and click and drag you can see is unselecting this area and it’s pretty much good and I think this is okay and so like those area also and I know you think this area is also deselect press alt or option and click and drag it will automatically deselect this area and this is great I think and just in celexa now we need to refine the edges because it consists in sound this area we need to refine the edges to polish so like this area and perfectly done the next thing just go to this one and selection and press shift to before click here press the shift key on your keyboard and click it here and it’ll come up this one and just refine the edges now with the selected because I don’t want to offend the edges because I don’t need this area it will keep on this on mobile screen so we don’t need to do this some refine the edges because we just want to select and refined it is this area just increase the contrast and you can see it’s bringing back this area again and hit OK now just hit OK now the next thing apply a layer mask on this this one place just press here it will apply the layer mask now press ctrl or command J again and delete this this little mouse delete this one and and don’t apply this one and just delete then invisible this one and invisible also these most and now go to this a paint tool you can see the pen tool select the pen tool and make a cell make a selection from here just click here and also this area and then click it here and just make us a little bit equity just ticket time and just remove this we select this area and then here now it will and the next simplest control our control in your qubit and if you’re using Mac with command then enter it will select this area and visible this one and apply a layer mask on that just apply the layer mask on here we can see we just apply this one the next thing you need to add some of this area you can see this area so we’re going to contain our and fill this area also to fill this area take the pen tool is pencil and come up here a little bit closer and also select this one and make it perfectly done here and click here also click it here now please control account enter and is OK now don’t select the layer mask select the layer you can see the layer select a layer go to this edit fill and you can see the content of you can see this one and $20 and heat okay now it’s reading bring this area back again so now press ctrl or command D to deselect this area again and do the same thing on this side this on and it’s okay now press ctrl or command enter again and go to edit fill and continue outfit hit OK now press ctrl or command D to deselect this area and go back on that and also select this area back again and control enter do the same thing go edit fill and continue our fellow now the next thing just peerscholar gone now we are done now you can see this area the edges is too much hole and it’s too much sharp on that so we need to fix this enough to fix this one what do you need to do that’s all Italian must consider llamas select a layer must go to the properties you can see the properties if you don’t find it here just go to windows and they can see the properties so like this one now increase the fader a little bit and you can see around 10 ticks or something like that and now you can see is making this ages moles Moodle now don’t do that so much it just around 8 or 6 people like this one and I think this is perfect and just ok now we are at our most in our in this composite it the next thing we need to add the Kingfisher to the bottom of tool and take this pink feature unlock this one and take this one here and paste it here now just ok now press ctrl or command T and make it a smaller like this one and next smaller and make it a little bit more smaller and weight it here now enter hit OK this is great the next thing we’ll just select this one do the same thing as I did it just go the quick selection take the quick selection first select this Kingfisher and also the fish select this one now it’s okay now we don’t need to be perfect I feel we can going to use some layer mask so that’s why it’s gonna you can you add just later so now apply the little mask in here and okay now you need to bring back songs we write again so just is easily take the brush and bring it back this way the follicle into one like that you select the layer mask and I just bringing back this area again make a little smaller it’s so much bigger and just a little smaller and just be back this area again also this side you can easily bring in that it’s not a big deal just easily you can bring in back this area again so it’s okay now we are done pretty much this case the next thing press ctrl or command AJ to make another one and select this layer and make this layer a little bigger and make the brush a little bit bigger and bring it back in this area again just do the same thing just like that now we’re adding this area is okay the next thing what do you need to do we need to make the brush a little bit opposite a little bit smaller like that 30 and being back this area this area something like that and how about this one it’s not okay just change this one fold in color like this one and it’s okay now we need to make this water color to match with this background to match it this one with the background to do that just select this one and go this in a dismal optic selective color now it’s kind of reddish in here so we first going to start get the red color just go to the color Channel and say deliver it and apply the cyan hundred-person since this magenta down if you increase the magenta to add them a detail you could increase this one it will add a green so Sian is opposite of red magenta is opposite of green and yellow is opposite of blue so ad G B is opposite of C my okay so this is great just bring me basis at some of the green and also add full blues now it’s kind of looking okay now we need to apply this one only to this layer to do that let’s alter option come up this layer on middle of this there we can see this one and a click arrow now it will apply only this color to our sub subject now press ctrl or command AJ make us come up some of the like that now apply this only to our the Kingfisher layer so just press other option and this is quit and I think it’s kind of matching with this program and it’s okay the next thing we need to add some of this greenish here we can see this area is in here so that is look more realistic to do that just select this and go ahead and create a new blank document in there now Glen clear we had done go to this one the clone Templeton take the clone stamp bundle and sample from sample of the current clear don’t it’s currently just select this all layer now it’s okay now I will select a sample from here if you want to use this area like that and paste also option and take a sample from here and apply this on into this area now if you want to don’t want too much on these things you can decrease the opacity like that around something like that and add this area to our this one and it’s kind of looking more bagels something like that and just add this going back again some of this area don’t need to get just hundred-percent same to same like that and if you think you can use any of them just take a sample from here also and apply this area and just match you the background that’s a little bit now this one this is not good now take a sample from here also and just apply this area and I think this is perfect and I think this is good the next thing just do the same thing take a sample from here and also match up this one in this area now if you thing is taking this one outside John Valley we are going to also fit this one the first match this one with and I think this match properly now it’s okay it’s match with our background now we’re done the next thing this layer must place all trough from the copy this layer mask and outputs apply this one into this area so you can see is remove this area and only apply this whatever we apply only to the on the screen now this is Grace and we are done pretty much the next immunity apply some of the color adjustment also some color mocha to add this one and just select this one and go to adjustment color mock-up welcome to add some of the color move club now goes added and yet some of the wormy color and I think I’m going to use and kind of wall Chris form and this is perfect not the criticism is too much we don’t want that so much this decree this one around 30 something like that and I think this is good and it’s okay for me the next thing we are going to add a doe the lighting here to add the light create a blank layer play fill it with the black to fill that with black twist control or command is it because well we will have a background color black so it will automatically fill in this one black color to fill this one just feels controller command editor backspace I refusing Mac command backspace or command D this it will open this one now we are done gorgeous filter render and you can see lens flare now select the prime in this one this a 150 prime and select this one in here and hit OK now change the black move into the screen and this this is okay now apply this area in here something this one and I think this is perfect and decrease this one is is too much we don’t want that too much just around something 75 or something like that is okay the next step we need to add our shadow in here we can see if you don’t make this shader is not going to look realistic to add this a shadow this is our main subject you can see this main subject and make it copy your heel press ctrl or command edge it copy layer and now delete the layer mask not delete this little must let your Nigel asked you to apply the layer mask or remove the lemmas in this case I’m going to apply the layer mask now apply this one now make a black around something like to make it black if you press ctrl or command and click it here and it will select this one you can also do the same thing just press double click here just press ctrl or command D double click here and can apply a color color overlay a black jin-suk black and this is black and hit OK no just it okay now press ctrl or command T to make a proportional change it press here and vertically now take this one and put it here something like this area and we need to fix that to fit this one just come up this everyone you can see this work tool and here now you can easily add this one in here whatever this area we like to add and how about this one and add this one also the match it just match this one and even well we can fix that one so we just hit OK another thing we’re done now break this opacity around for something like this one and let this more and this is good now we did you apply a blur –is– to make this more realistic now go to a blur go to filter and blur add Gaussian blur now increase this one I use 35 what the things you like to add you can easily add this and I think I’m going to throw to something like that and it’s perfect for me and he’d okay now we created our awesome this one you can see now decreased a little bit more in this case is too much in this case but ten I think 10 is perfect for me and you can see this one is adding some shadow here now this is great now add some of the karamakov and outset so that is look more good to do that take a blank layer and feed with a black press ctrl or command backspace it is the black and then apply a layer mask apply this one a layer mask take the brush and make this brush a little bit bigger and remove this area like this a little smaller here and maybe a little more and I think this is OK now change the blend mode this layer will change the blend mode go to some blending option and apply the soft light now I think it’s too much so we’re going to decrease this one around 60 or something like that something for the fifty eighteen fifty is perfect and you can see it’s okay now we just created our awesome it’s really composite in made in Photoshop and I just show you all the things step by step so that it can allow you can also do that same thing if you want to do the same and you want to practice your own and just check the link in the description I will put all the images linked so that you can download this image and also you can create your own composite and I hope you’ll like this to tell you this hit that like button if you don’t like it you can also click that on this like button in this case I don’t want you to keep that on this like button and I hope you like this if you like this just make sure to subscribe my channel and also press that pair I can you can also check out my other tutorials in my chest.
As found on Youtube
Posted in Photoshop


Recent Comments