Editing Wildlife in Lightroom
bhadra 0 Comments Light Room
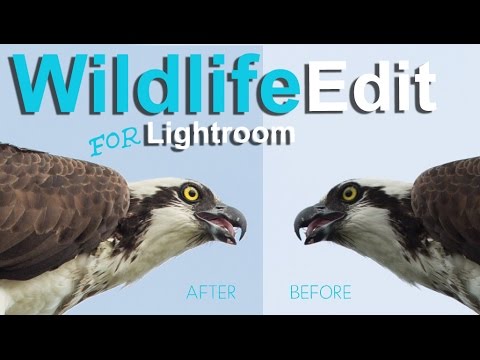
Hey every body, Chelsea right here and at present i’mgoing to show you easy methods to fix your tousled wildlife photos using Lightroom.So I spoke to my peeps in our Lightroom 5 e-book crew, if you understand about us you knowabout our booklet, we talk about it non-stop. I went to them and that i said whats up guys whatwould you wish to have, would you alternatively that I edited a quite ideal, beautifulwildlife photo on the grounds that you do get some flack for those who don’t try this, or do youwant to look actual pics with real errors? And people variety humans instructed methey wanted some real pictures they desired to look some errors, so right here I carry toyou my mediocre picture filled with errors. First of all, the area is underexposed,proper? It is darkish, the composition leaves loads to bedesired and the sky is blown out. There may be like, chromatic aberration, thepicture is a large number, so let’s begin with the aid of cropping it down andwe’ll work from there. So first i’ll go to my crop device and Ilike my wildlife graphics to be cropped very tight, given that i believe folks wantto see the animal unless the surroundings are reallybeautiful.And let’s see right here, put his eye in concerning the upper 0.33. I’m now not so involved about cropping out thefish, let’s see how that looks. I consider i will go a bit tighter very simple, however i like that it can be closeand it shows some detail. Let me experiment and go a little bittighter just to peer. I like that. Ok, so next I must be certain that oursubject is adequately exposed. So i will deliver up the shadows. And i’m now not going to bring up theexposure for the reason that i’ll also be lightening the history which i do not wish to do,because i need to recover the blue in the sky next and that i believe that elevating theshadows would be a greater suggestion for that. So i’ll lift the shadows rather somewhat and it looks good.He’s not over-uncovered, you’ll discover still see the featherdetail, our fish looks pleasant here. Ok And next i’ll go into the colours panel here and pick theblue and scale down the luminance. For those who go toofar you then get this funky glow round your field, it also looks relatively false, you do not wantto overdo it. I am also going to heat up my field tomake it look like I went out for the duration of the goldenhour, which i didn’t.But that means that i am going to justput the blue sky somewhat bit closer to the turquoise part, so it looks a littlebit heat. If I were to warm up the temperature of the snapshot right here, it washes out the historical past. Soinstead what you need to do is pick your adjustment brush and go to temp and then pick your area. I’mgoing to press O and so as to exhibit you our mask. I’m going to go in here and zoom in2:1 to get really high-quality and shut and ensure that I’ve selected my subjectproperly. Mhm And you wish to have to decide upon the fish too, he is apart of it. Ok now press O once more to eliminate the masks and you will discover that it appears alittle bit hotter, and you went and also you took that crummy light and made it intosomething wonderful. It does look just like the golden hour. Let’s examine, i’ll try to heat it up just a bit extra.Andthen i’m going to decide upon new and this makes a new adjustment brush. And i’malso going to prefer the stick because that is part of it too, but sometimes,you recognize the fowl has white on it and mostly so as to seem even moreorange for those who try to elevate the levels an excessive amount of. The stick is darker so itmay be a little bit extra resistant to changing the temperature. I’ll opt for this accretion once more and try elevating the saturation just a little bit. Okay, after which next i’m going to pick an additional adjustmentbrush and i’ll bring out his eyes. Let me zoom in again 2:1. If your masks color will not be displaying up, in the event you press Shift+O and it willchange it. I raised the highlights just a little bit andthe sharpness.I’ll pick a new brush and go over the identical part of the attention. Let me exhibit you what i am doing right here. And some of the beak. And convey up the sharpness. Now not an excessive amount of or else it gets very grainy. And let’s just see a before and after simply to ensure we’re stepping into theright path. That’s now not a before and after. It would not show one of the vital edits. Good enough, next i will convey out the sharpness of thefeathers just a little. I’ll prefer the adjustment brush again. I am all about selecting a bunch of adjustmentbrushes and just making little adjustments at a time Why? So i do not go overboard, so i can goback and modify one section at a time.I wish to just convey up the sharpness alittle bit. Let’s zoom in once more very shut andmake definite that we’re now not making any destructive edits, we do not need to create too much noise. See, that’s too noisy it looks veryartificial. Okay. I suppose that the fish is an most important a part of the story so i am gonna supply him somewhat little bit of awareness too. I’m gonna go to readability i will put the clarity downbecause i will be able to are likely to darken it up. I’m going to carry up his publicity a little bit bit and hisshadows, brighten up the fish. Slightly more saturation when you consider that i admire his colors. And the sharpness. The highlights make him seem a littleshinier, let’s see.There may be a earlier than and after, that appears significantly better. I’m going to bring out the fish’s eye a bit too. So a different factor that i might wish to showyou that i do not i consider is necessarily needed on this picture, however ithink it can be a original quandary, is find out how to scale back noise. You get a lot of noise in primarycolors, so you probably have very blurred inexperienced leaves within the heritage, there may be a goodchance that there may be a number of noise.When you’ve got a very blue sky that you just didn’thave to darken like I did there is a good threat you’ve gotten lots ofnoise. In this photo the noise, one can find it is within the shadows. Let’s go in 2:1 and i will show you.You’ll discover the underside of this branch, it is out of center of attention but it surely’s noisy and thefeathers have a little of noise too. I will show you learn how to do it on the department,I do not know that it’s going to make a significant change in this photo, but if you want it on your backgroundthen it’s really essential and that’s a crisis we see with a variety of wildlifepictures that we get.A number of shadow noise or primary color noise So once more, your adjustment brush and i’m going to go to noise. And let’s decide upon this brush, uh, this branch. It is quite tough to look the noise inthis example since the branch has numerous texture. However either approach i’ll be teaching you a priceless procedure. So this is the normal, that you would be able to put the noise all of the manner up, and if that will get too delicate you can put alittle, a little bit bit, about 20-25 and it’s extra practical.I’m gonna exhibit you on some feathers, perhaps thatwill be a better illustration. So that is how you slash the noise inyour photo when you’ve got that trouble. Or else, good for you! Fortunately thispicture wasn’t too noisy, that’s no longer particularly one of the issues that I had. One challenge that I do have in thispicture is a little of chromatic aberration, you’ll discover it correct here. That you can go all the way down to the bottom and go to lenscorrection, and colour, and get rid of chromatic aberration and usuallyautomatically it does a excellent job. If it doesn’t you could opt for thesecolors underneath defringe, and even use the dropper device and it willtake care of it for you. Let me see if i’ve every other chromatic aberrationother than on the stick.Let me simply see the before and after once more. Ijust want to see if I could make it even sunnier. Okay, I feel i will be able to. Good enough, so i think we’re virtually finished.We took that blown out looking sky and we put some blue back into it. We tookcare of the chromatic aberration, introduced out this lovely creatures eyes, andbrought up the publicity on the osprey seeing that it appeared too dark. Let’s have a look at the earlier than and after as it is.It can be a tremendous improvement, this is not even including the crop andwe grew to become a quite boring, blah snapshot to whatever that is a little extra pleasingto seem at. Not the greatest, but nonetheless much betterthan before. I believe we would even tweak it a littlebit more and deliver out those warm colors on the Osprey to get more of that goldenhour look, so let’s are trying.So that you reselect your pin and it’ll showyou that layer. Come on now, do not make a liar of me. There we go, that’s the mistaken one. That is thecorrect one, despite the fact that it is no longer showing me. Let’s bringup the temperature. So that is the layer where I introduced that heat mild. Okay, so let me take my mask off andwarm it up just a bit bit extra, might be even bring up the saturation a littlebit. Eh, i will dial it again, it felt a bit bit artificial. K. There’s the before and after and i’mpretty cheerful with the results. I will have extra videos, i’m going to doone with the noise next time because I believe like i couldn’t offer you a greatexample. When you have more suggestions, which you could put them in the comments.In case you’rein our lightroom 5 book group, continually share your strategies on the grounds that i reallylike to do what you guys wish to do and thank you a lot for watching..
As found on Youtube
Posted in Light Room


