DIGITAL GRAFFITI LETTERS – URBAN ART IN ILLUSTRATOR 🅿🅰🆁🆃 2
bhadra 0 Comments Illustrator
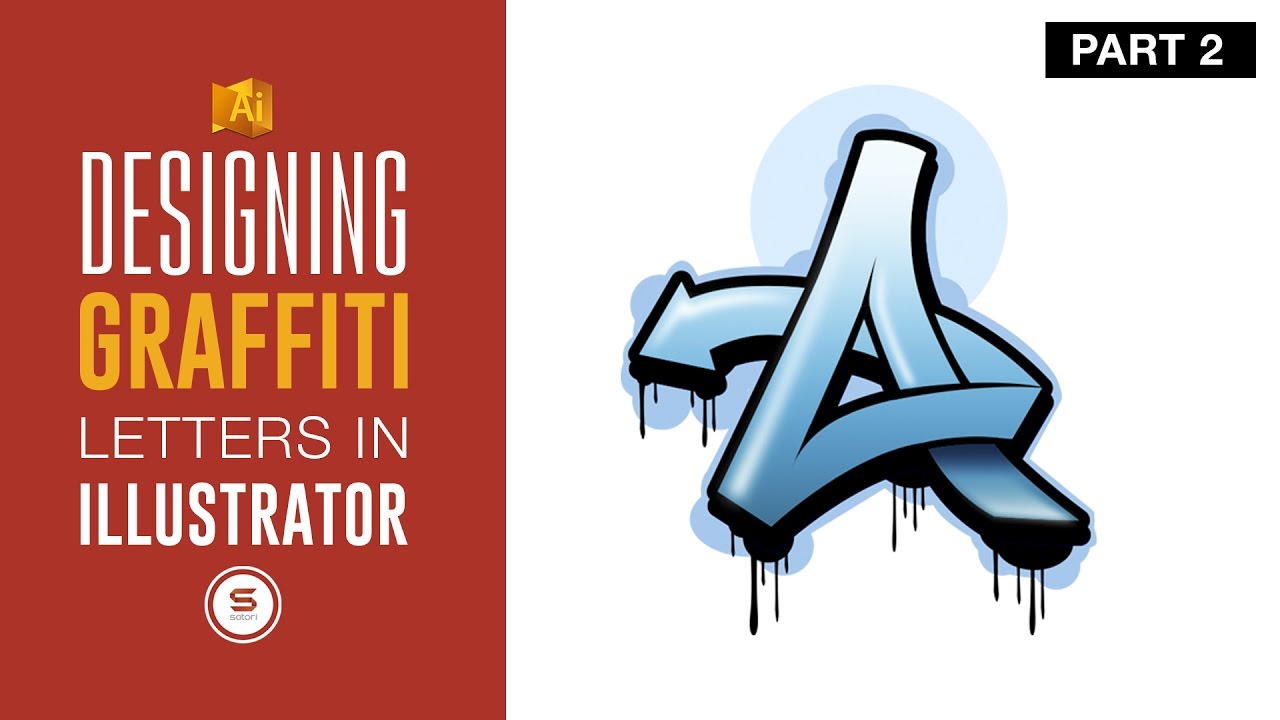
it's Tom here and welcome back to digital graffiti letters part two digital art tutorial in Adobe Illustrator this is the second part as promised of the digital graffiti tutorial if you missed part one and be sure to check it out by clicking the link in the description for the card in the corner last time we created the outline of a graffiti letter and then built up a shadow layer and the first gradient layer we're going to continue with the artistic details so let's jump right into it we're going to start making highlights for this you must imagine some light coming from a specific direction how that would highlight the graffiti letter or shape then select either white or shaded very close to white in the color palette select the pen tool and switch the color two-stroke i would imagine the light source for mine is coming from the upper left so firstly i will create a shape along the left side vertically with the pen tool you can adjust it with the white arrow selection tool afterwards once you're happy with the shape highlight it and switch it from a stroke to a color feel like so we can leave it like this and that might be the look you're going for but personally i'm going to add a blur effect i like the shape again and go up to affect blur Gaussian blur to the settings that apply to your design ok I forgot to add the second gradient layer which is no problem we can go ahead and do that right now I like the upper layer and then hold down out until you see this icon appear then click and drag to duplicate face it back over the top exactly in place to make sure the highlight we've made before is above me be the first gradient layer was quite at the top and invisible the bottom but we will flip this so it's invisible and up top and dark blue at the bottom you could make this in one gradient layer with the way to the top and the blue the bottom but i find it blends a lot better get separated into two gradient layers with invisible strikes used quick tip hold down the spacebar and click to move around easily now select the pencil enjoy yourself in shape where you would imagine to see some shadow or shading so for me the light is coming from the upper left making this part under the cross-section being Emily lit doesn't matter right now what color the path is that your drawing but we want to put it in apt there when you have the shape make sure you fill it with a gradient like this because it is a shadow I want to make the gradient background color again play around the degrees of the angle and keep one side invisible it blends nicely we can clean it up with the white selection to after we have the gradient set ok ok to speed up this tutorial i would go ahead and use the same technique of creating highlights and shading on my graffiti let it use the pen tool to create your shapes as shown in either use the Gaussian blur for the gradient felt I was really happy with that remember you can go back and edit your work anytime we're nearly at the finishing line people you will now make a dripping paint effect select the pet tool here and highlight the shadow layer we want the pain to be the same color then with the ellipse tool make a circle shape they see where you want and then with the pencil create a drip shape it would be best to send the shapes to the back by highlighting them and going up object sender back again i will go ahead and create all of my paint drips you right back after as you can see also outline the path with the pen tool around the shape flip the path to fill and then go up to object and centre-back i'm going to add a layer to the background giving the design more depth you can have anything you want just be created and let your imagination run wild but remember save your work I find a design is finished let me know what you think and how you always came out i really hope this tutorial helped you understanding designing your own graffiti letters be sure to hit that like button and subscribe for weekly content tutorials every Tuesday speed our videos every Thursday and one minute graphic design hacks on sunday until next time design your future today