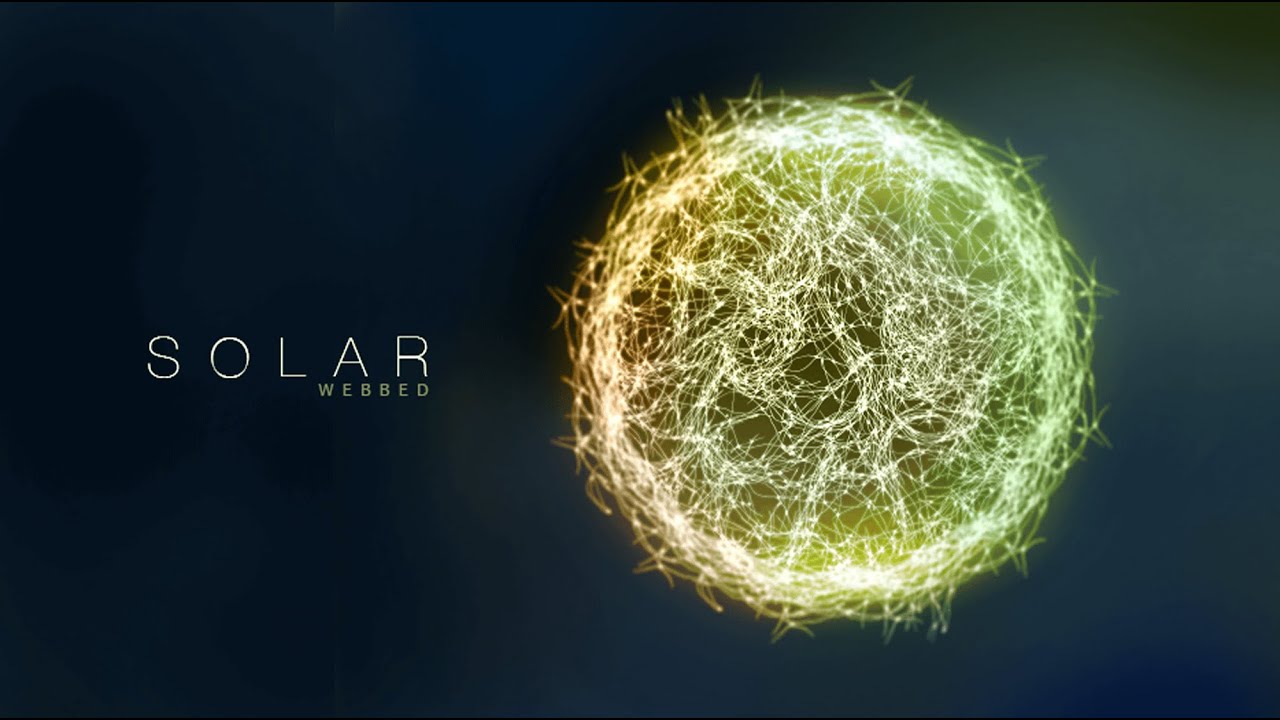
Graphic Design – Adobe Illustrator/Photoshop – SOLAR webbed
bhadra 0 Comments Illustrator Photoshop
Solar Webbed Design
Welcome back to another Episode of creatnprocess. Today we will be working on SOLAR webbed graphic
design. We will create out the vector web in illustrator
and design the Solar effects in Photoshop. So lets begin with the tutorial. Open a new Illustrator document. To create out the webbed structure, we will
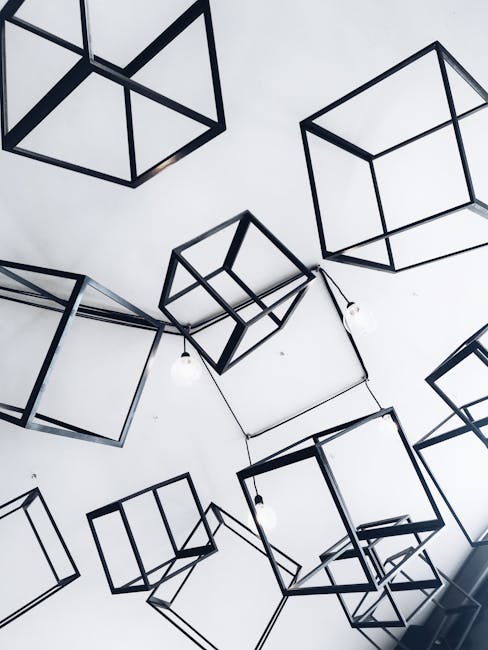
use some reference images. You can find different types of images on
the web. So we will use black image for this design. Drag & drop to Ai document. Scale down the size and Embed the image. Next trace the image to black & white. This will convert the image to vector. After this expand the object and ungroup it. Separate each element. Now select the web using the selection tool. Place to aside and change the color to dark
color. In the same way select the other web, drag
and change the color to dark.
Now select all the remaining pieces and delete
it. Before we begin, add a black rectangle for
background. Place the web over it and arrange them to
front. We will apply very light yellow color using
the color picker. Select the light yellow and click ok. Next using the smaller web, we will create
out a circle. Select the smaller web and scale down the
size little bit. Now using the rotate tool, set the anchor
point around here. Now with the alt pressed just click and drag
to create a duplicate. Duplicate multiple webs using the short-cut
Command/Ctrl + D. Do little adjustment to fill up the empty space.
Next bring in the second web and scale down
the size to match the design. Tilt it to an angle and place it close to
the border. Now using the Rotate tool, set the anchor
point to the centre. Click and drag to create a duplicate with
the alt pressed and command/Ctrl + D to duplicate it for multiple numbers. Change the Rotation of each webs to avoid
similarity. Place one more web to the centre with slight
change in rotation to complete the design. Next to create out the Solar effect, we will
open a new Photoshop document. Fill it up with black background color. Now drag & drop the web vector inside Photoshop. Scale up the size and place it around here. To give the effect, we will be using multiple
layers with different blending modes.Add a new layer and change the mode to color. Select the soft brush tool. Change the fill color to dark faded orange
and click ok. Apply it over the left portion of the web. Adjust the size and opacity to give a gradual
blending. For the other side, choose light green and
apply it over the edges.
We will be applying various other ranges of
color to give volume to the design. Next hide the color layer and double click
on the smart object layer. Under layer style panel apply color overlay. Change the color to light yellow. Next selecting the smart object layer, go
to Filter > Blur Gallery > Iris Blur. Make the shape circular, drag in the white
circle and reduce the blur value around 5px. Then click ok. Next add a new layer above background layer.
Hide the color layer, then choose dark Green
color using the color picker. Now with the soft brush tool, apply the color
on the New blank layer just below the web vector. Next unhide the color layer. Lets apply some darker tone to the edges on
either sides. Give warm color on both top and bottom. Next add a new layer for highlight. Change the layer mode to color dodge. Now choose yellow color. Apply it over the top & bottom of the design. Use lower opacity while applying over the
sides. Also use eraser tool to reduce overly highlighted
areas.
Double click on the blur gallery to increase
the blue value to 9. Next we will add a new layer to create a fog
effect over the surrounding. Choose yellow color and apply over here. Then green to apply over here. At this corner lets give dark blue. Now go to Filter > Blur > Radial Blur. We set the amount to 11 and click ok. Reduce the layer opacity around 58%.
Then again go to Filter > Blur > Gaussian
Blur. Set the radius value to 126px. We got a soft fog effect. We can keep on adjusting until we get a nice
effect. Increase the highlight on the top portion
to show heat. Add brightness and contrast adjustment layer,
set the contrast to 29 and brightness to 17. Next add Hue & Saturation adjustment layer. Increase the saturation value to +27 & hue
value to -6. This will enhance the contrast on the solar
effect. Lastly type out the text with proper font.
Finally we have completed Solar Webbeds graphic
design. I hope you enjoy the tutorial, don’t forget
to check out the next tutorial coming up. And if you want more updates on designing. Like, Share & Subscribe!!.


