Layers in Adobe Photoshop Ep5/33 [Adobe Photoshop for Beginners]
bhadra 0 Comments Uncategorized
(upbeat digital music) – [Gareth] Hello and
welcome to this video. Gareth here from TastyTuts.com. Now if you're completely new to Photoshop, you will soon come to realize that layers are the fundamental basis for any artwork created in Photoshop. The layers panel is one of
the most important panels in this program. And it's from this panel
that you will coordinate your entire composition. In this tutorial, we're
going to take a closer look at layers in Photoshop. In a previous episode, I demonstrated how to
create a custom workspace. If you have not seen that episode, the workspace is basically
a panel sect up here in Photoshop. For this tutorial, we will
be using this workspace and along the way we will be
referencing the layers panel. If you don't have the
layers panel visible, you can either skip to the previous video and learn how I set up this workspace or simply come up to the top menu, select Window and click Layers to activate your layers
panel if you do not see it. So here is my layers panel, over here on the right. So to follow along with this tutorial, you will need to open this document I have prepared especially for this video.
This can be found in
the Introduction folder in the Project folder. Now you can download this
project folder for free, the download link is in the description. So with the Project folder
open, click Introduction, Layers, and open the Layers file inside and you should have something
that looks like this. Now we are going to be
covering a lot in this video. And in quite some depth. If you wish to skip ahead at
any point in the video or back, you can do so quite simply. The topics covered in this video are listed in the description
and in the course PDF along with their times so
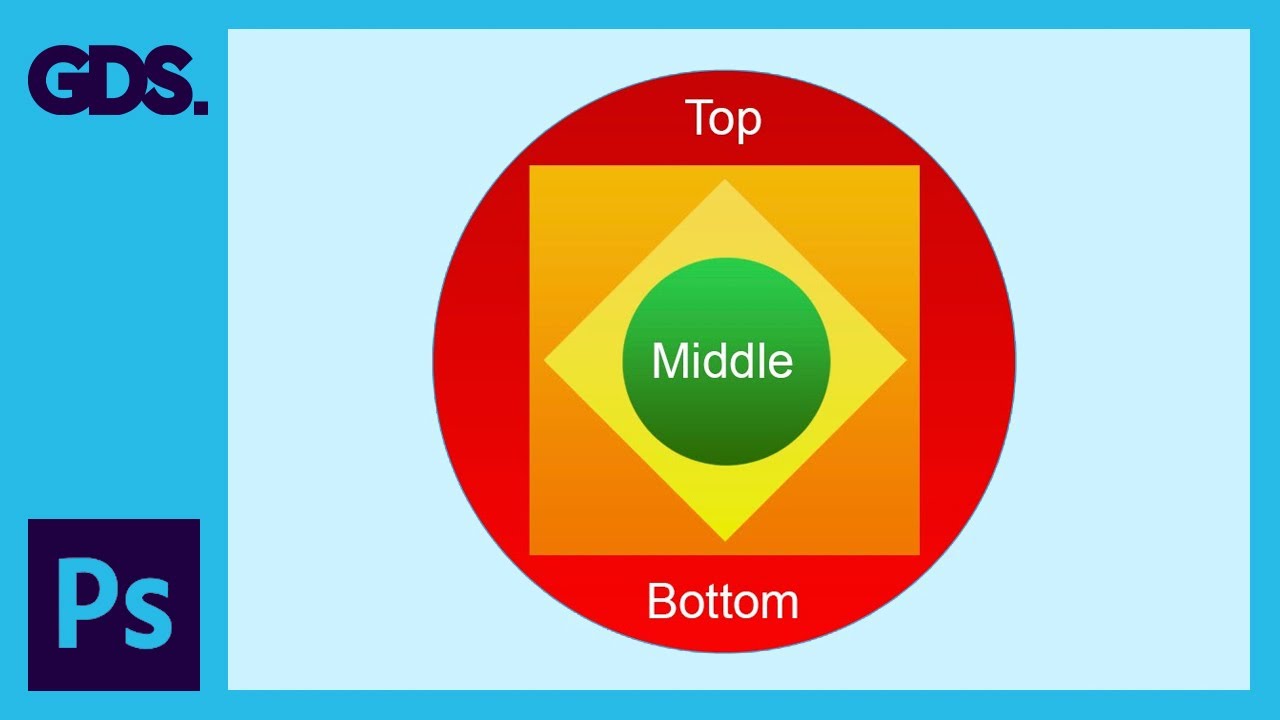
be sure to check that out. So here we can see, we have an arrangement in the canvas area and this is an example I'm going to use in order to
demonstrate the principles of layers and how they
work in the layers panel. So here we can see, we
have a number of objects in the canvas area that
make up this composition.
We have some shapes and we
have some type elements. Now if we look closely in the layers panel over here on the right, we can see that each element
that exists in the canvas area is represented by its own individual layer which are all stacked on
top of each other in rows. Each layer has a name to the right and an image thumbnail on the left to give us a quick preview as
to what exists in the layer and what type of layer this is.
The way layers panel works
is by stacking layers on top of each other in hierarchy. Quite like stacking sheets of
paper on top of each other. Whichever layer is at the
top of the layer stack is the layer which will
have the most visibility. And the layer at the bottom
will have the least visibility hidden by any layer which
happens to be above it.
Now, there are many types of layers that can be created in your document. As you begin to create in Photoshop, you will find yourself
dealing with various types of creative elements. Over the duration of this course, we're going to be dealing with a variety of different layer types. Layer types can be identified by the icons that feature on the layer
in the layers panel. If we look in the layers panel here, we can see that in this document, we have two types of layers. We have roster layers
and these are represented by thumbnails on the left which displays the
placement inside the doc and we have type layers. These have the icon T on the left. You will need to pay
close attention to these as these will help indicate
the contents of your document. In the layers panel, you have the ability to
filter by layer type. As you create in Photoshop, you will often create complex
documents with many layers.
At the top of the layers panel, we have the layer types you can filter by. First is pixel layer, this is basically a roster layer. Next is adjustment layers, next, type layer, next, shape layer, and finally, smart object layers. So these are the types of layers that can be created in Photoshop. We will be learning all about these layers later in the course. Now, in the layers panel, we have the ability to select layers individually with the mouse. As we select a layer, it
will become highlighted and that's how we identify which layer is currently selected. This is going to enable us
to focus on particular layers in the future and apply
various effects and so on. But we're not going to go
into that too much right now. So in Photoshop, the layers panel works in a hierarchy structure, top to bottom. So each element is treated
separately on its own layer. Now, if you wish to move
a particular element in the canvas area around, we will need to use the move tool.
The move tool is the top
tool in the tools menu over on the left. This is represented by a white arrow with a crosshair next to it. Depending on the particular
layer you have selected in your layers panel, you will be able to move the
contents of the layer around. For example, I'm going to
click the red circle layer in the layers panel. Next, I'm going to come to
the move tool and click it to make sure I have it selected. Then, I'm going to move my mouse cursor into the canvas area and click and drag to move the red circle around like so. So now nothing is moving
apart from the contents of that layer. I'll quickly come up
to Edit and click Undo to move it back into its original place.
Next, I'll select the middle type layer in the layers panel, the type layer and with the move tool active, I click and drag this around like so to reposition should I wish. Again, we can see that we are only moving the contents of that layer around. So again, I'll quickly come
up to Edit and click Undo to move it back into its original place. So to move objects around
in the canvas area, we must first have the layer selected and use the move tool. Now, let's for a second
look at this composition. We can see what looks like a
red circle in the background, on top of that we have an orange square, on top of that, a yellow square, on top of that, a green circle, and on top of that, we have some type. But if we look in the layers panel, we can see that the layer
structure does not reflect this. For example, the green
circle which appears to be above the yellow and orange square, is in fact below them in the layers panel.
If I click on the orange square
layer in the layers panel, then make sure I have
the move tool selected in the menu on the left, this
being the top arrow icon, I can click and hold on the canvas area and drag the object around. We can see that it's actually
behind the yellow square and on top of the green circle. And if we look in the layers
panel, we can see this. I'll quickly come up
to Edit and click Undo to move that back into its original place.
Now if I click on the green circle, and move that around, we can see that it's actually behind
the yellow and orange square. Even though, at a glance, it appears to be on top of them. Again, I'll quickly
come to Edit, click Undo and put that back into place. Lastly, I'll select the
type layer called Top in the layers panel and move that around and we can see that this
is behind the green circle and yellow and orange square. And we can see this is
true in the layers panel. So remember, things are
not always what they seem in the canvas area. You will always have to keep
an eye on the layers panel to understand the true
structure of any composition. Now, should we wish to edit the structure of the layers in the artwork, this can be done quite simply by clicking and dragging a
layer in the layers panel. Let's say for example, we want to bring the
red circle to the top. In the layers panel, we
can click on the layer and drag it up like so. Wherever we release click,
the layer will be placed in that position.
If I continue to drag the
layer into various positions in the layers panel, we
will see the layer on top, such as the type and the colored squares. So moving and altering the layer structure can be done quite simply. Now if we look closely
to the left of each layer in the layers panel, we have these little
icons that look like eyes. These icons represent the
visibility of each layer in the layers panel. For example, if I click
on the green circle layer and click on this icon, the circle will disappear
from the canvas area. And we can see the eye icon is gone.
What I have done there,
is toggle the visibility of the layer. I have not deleted the element, I have simply made it disappear. In this instance, the
icon is also removed, telling me that this layer
is currently invisible. If I want the layer to reappear, I can simply click back
on the visibility icon, the circle will appear in the canvas area and the icon is back. So keep in mind, these
little icons are used to toggle visibility of layers. Easy. Now there is a crucial concept that should be known to
all newcomers to Photoshop and that is transparency. So currently, we can
see in the canvas area all the creative objects that
make up this composition.
Now we have just seen how
we can toggle the visibility of the layers. This time, I'm going to start from the top and make my way down, toggling
the visibility of each layer. So now, I am all the way down
to the white background layer. The last layer at the bottom
of my layer structure. All the elements are currently invisible and all I can see is the white background. Now, if I finally toggle the visibility of the white background,
I can see what appears to be a grid of gray and white squares. Now in Photoshop, this
represents transparency. Basically nothing, empty space. So what does this mean? And why is it there? Well, for example, if I
now toggle the visibility of the orange square layer back, we can see the grid appearing around the outside and the inside of the square. This is Photoshop telling us
that this area is transparent.
If we also take a closer
look at the thumbnails in the layer panel, we can see that around the colored shapes, we have the grid texture. Again, this is Photoshop telling us in those thumbnails that
these elements are existing in transparent space. If we look at the white background, we can see that it's solid white covering the entire canvas area. Compared to the green
circle that is also solid but does not fill the entire canvas area. The area around it is transparent. If I toggle the visibility
of the green circle layer, we now have the circle in the middle with the transparent
area around them both. Now having the transparency like this will enable us to export
and save this image to use in other projects or creative media to retain transparency
in and around the artwork so it's not set on a white background.

We'll be learning more about
this later in the course. So now I'm going to come
and toggle visibility of all the layers back on
so we can see everything. Excellent. Now as you create new layers in Photoshop, you may wish to rename them. To change a name of a layer,
simply move your mouse cursor over the name in the
layer in the layers panel and double click. This will enable you to
change the name like so. Easy. Now in Photoshop, we have the option to toggle the opacity of a layer, make it see through. Currently all the layers in my composition are set to 100% opacity. Now, for example, if I
want to toggle the opacity of the red circle, first
I need to select the layer in the layers panel. And if I look closely up at the top right of the layers panel, we have an option called opacity. Currently we can see this is set to 100%. Now here, I can do one of two things. Either I can click and type
in the exact value I wish or I can move my mouse
cursor over the word opacity to the left and notice
the mouse cursor changed to a left and right arrow.
Now if I click and drag to the left, I will begin to toggle the opacity. The value will change in the box and the creative element
on the canvas area will begin to fade away. So I'll toggle this down to around 50% and now we can see the red
circle is slightly lighter on the blue background. This time I'm going to
select the green circle but instead of clicking and
dragging on the opacity, I'm going to click
directly into the value box and type 70, this will set the
opacity of this layer to 70%. Now notice that because this
green is slightly transparent, it's blending into the red
circle in the background and essentially creating the
illusion of a new color tone. If I move the green circle to
the edge of the red circle, we can see as you alter
the opacity of the layers in Photoshop, you will
allow the layer beneath to be seen through.
So that is how you can toggle opacity on your layers in Photoshop. Now what you'll come
to learn as we progress through the course, is that sometimes if we wish to create a new
element in a composition, we will have to create a new layer. To create a new layer, is quite simple. But first, you will have to keep in mind which layer you currently have selected. Because when you create a new layer, it will be created
immediately above the layer you have selected. For example, I'm gong to
select the yellow square layer in the layers panel
and create a new layer.
Now I can either come to the
bottom of the layers panel and click the add layer
icon, second from the right or click up to the top
right of the layers panel and click the dropdown and here
I can also click New Layer. In this instance, I'm just going
to click the new layer icon at the bottom of the layers
panel, second from the right and upon click, a new
layer will be created above the yellow square layer
which was previously created. By default, the layer
will be called layer one. If you continue to
create additional layers, the name convention will go up, layer two, layer three, and so on. For this example, I'm going
to double click on the name and call this New Empty Layer.
Now when you create a
new layer in this way, the layer will be transparent. In other words, empty. If we look carefully
in the thumbnail image of this layer in the
layers panel, we can see it's filled with the gray
and white square texture. This layer is now ready to create on. So that's how you can create
a new layer in Photoshop. If you wish to remove or delete the layer, this can easily be done
by selecting the layer and simply pressing the delete
icon in the bottom right of the layers panel or
backspace on your keyboard. In Photoshop, you can also lock layers. Should you place an
element in your composition you do not want to accidentally
change in the future, you can simply apply a lock. To do this, first select
the layer you wish to lock. For example, I want to
lock the red circle here so in the layers panel, I'll first select the red circle layer. Up towards the top left
on the layers panel, we have a series of icons. On the far right, we have a lock all icon.
Upon click, we will now see a lock icon appear on the red circle layer and if I try for example to
move this red circle around with the move tool, I
will not be able to do so and I will get a message
telling me this layer is locked. Should I wish to make further changes to this layer in the future, then all I have to do is simply
come into the layers panel, click on the lock icon
on the specific layer and that will release the lock. Easy. In Photoshop, you can
also link layers together. Let's say you have separate
layers in your layers panel that make up a particular creative group in your composition. For example, the yellow and orange squares in a composition are
on two separate layers. But whenever I move the orange square, I want to keep the yellow square with it.
So in the layers panel, if I
select the yellow square layer, press and hold Shift on the keyboard and select the orange layer below, we will now have them both selected. By pressing and holding
Shift on the keyboard, we can select, well we can click and
select multiple layers in the layers panel. With them both selected, I
can right click on the mouse. From the menu that appears,
I can select Link Layers. Upon click, we will now see
the link icon on both layers in the layers panel. Now if I simply click
on one of the layers. For example, the orange square, I no longer have the
yellow square selected, though if I activate the move tool and click to move the orange square around in the canvas area, notice how the yellow
square moves around with it.
This is because they
are now linked together. So, to unlink the layers, simply click on one of
the layers and the link, right click and select, Unlink Layers. Easy. This can be really useful when you begin to build
complex compositions and wish to keep various layers together. Another feature in the layers panel which is similar to the links, is groups. As you begin to create complex
compositions in Photoshop, you may find yourself creating
excessive amounts of layers in your layers panel. A useful feature to keep
your layers organized in your layers panel
is to use layer groups. So to create a group is very similar to creating a new layer. At the bottom of the layers panel, we have an icon, third from the right, called create new group. Also if we click on the top right menu, we can choose New Group from here as well. Just like creating a new layer, we need to keep in mind
which layer we have selected before creating the group. As the group will be
created directly above. So for example, I want
to create a new group and I'm going to place
all the shape elements from my composition inside it.
So with the orange square layer selected, I'm going to come down to the
bottom of the layers panel and click the add new layer group icon. Upon click, we will see a new group appear in the layers panel. And by default, it's called group one. Now just like with layers, we can double click on
the name of the group and rename it. In this instance, I'm
going to rename this group to Shapes. With the folder renamed, I'm going to begin to click
and drag my shape layers into the folder like so. Now when I do this, you will
notice something change. What you must remember with layer groups, is as you drag your layers into them, the layer will automatically be placed at the bottom of the group. You may find as you drag in your layers, this is going to alter the
layer structure you may intend. So once your layers are
dragged in to the group, you will need to reposition
your layers inside the group to get the structure you're happy with. Notice on the layer group, on the left you have a toggle. This will allow you to
toggle the visibility of the layer group contents like so.
This will help you simplify
your layer structure at a glance. Now once your layers are
contained inside a group folder, just like with linking layers, if I now click the folder
layer in the layers panel, with the move tool active, I can now move the entire contents of the folder around in one go like so. Now if I wish to move a
particular layer inside the group, I can simply click the
individual layer inside the group and move it around like so, simple. If I toggle the visibility
of the group folder, I will also be able to
toggle the visibility of the entire groups contents like so. Just like with layers, you
can also click and move your groups around in the layers panel should you wish to alter
the layers structure.
So next, I'm going to
create a new layer group. I'm going to call this group Type and I'm going to drag in the
type layers into the folder then I'm going to create a new folder and call this background and
drag in the white background. So now I have three groups
containing specific elements of my composition arranged in
the correct structure like so. Nice and neat. So using layer folders
can be really useful for housekeeping. Streamlining your layer structure and having control of the
elements in your composition. Now the last thing I want to
demonstrate in this tutorial is layer colors. Something that was brought
into more recent versions of Photoshop, is the ability
to color your layers. Now this again, can be really
handy to organize your layers.
As you build lots and lost of
layers in your layers panel, it can begin to seem
monotonous to the eye. The ability to color
your layers and groups helps you visually separate your groups. So here I have three groups. Now if I select the top
group and right click, towards the bottom we have some colors we can assign to the group. In this example, I'm going to select red. Upon click, we will see
the red is now assigned to the Type group. Next, I'm going to click
on the Shapes folder, right click and assign a yellow color. Next, I'm going to select
the background folder, right click and assign a violet color. So now, at a glance, we can see three, clearly
distinguishable folders and if I toggle down each folder like so, we can see that the
layers within the groups have also been assigned the colors.
So in this instance,
the colors are helping to identify which group they belong to. If I want to assign a
different color to a layer within a group, all I need
to do is select the layer, right click and select a new color. Easy. So that is an introduction
to the layers panel in Adobe Photoshop. In the next video, I'm going to discuss a
few common file types you will need to be aware of as you begin to use Photoshop.
So see you in the next video. (upbeat electronic music).
Posted in Uncategorized


