How To Change Background Color in Photoshop (Fast & Easy!)
bhadra 0 Comments Photoshop
Hi. Welcome back to the PhotoshopTrainingChannel.com. I'm Jesus Ramirez. In this video, I'm going to show you how to
change the color of a background in Photoshop. This is going to be a fast and easy technique
that anyone should be able to follow along, even if you're a beginner. Okay, let's get started. We're going to work with
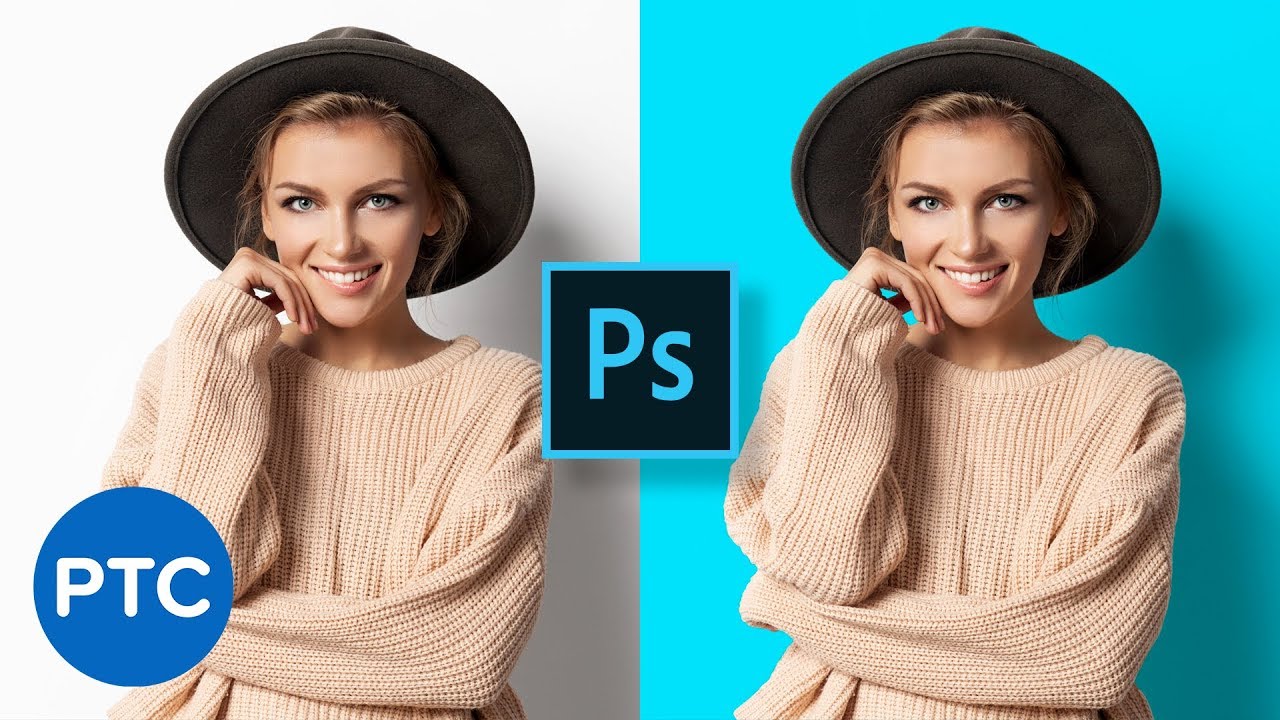
this image of this model. She is, of course, in a white background,
and what we're going to do is change the background color to anything that we want. For this tutorial so that you can follow along,
your image will need a white background.
If your image does not have a white background,
then I have a tutorial on making backgrounds. I'll place a link down below in the description. Once you get your white background you can
come back and follow this tutorial. The first step is to make a selection out
of our model so we can separate her from the background, and we can use the quick selection
tool for that. In older versions of Photoshop you can just
click and drag and make a selection out of our model. But in Photoshop CC 2019, you actually have
the select subject button which is a button that uses artificial intelligence,
known as Adobe Sensei, to analyze an image and select the subject of the image. So when you click on this button, Photoshop
will ask you if you want to discard any active selections. I do want to discard it so I'm going to press
okay. Then it will analyze the image and make a
selection, and in this case, it made a really, really good selection.
There's only a couple of areas
that we need to fix. If you zoom in, you can see that I missed
the fingers and maybe the corner of her hand there next to the hat, and we can easily fix
that by pressing the Q key on keyboard. That enters a quick mask mode and you can
use the brush tool. So you paint with black or white to select
for these pixels. I have black as my foreground color so that means that I can zoom in
and paint away the white next to her hand.
So anything that is in red will be hidden. So I want to hide these white pixels, and
I also want to pan over by holding the space bar to this area and just make a really quick
selection here. So remember, anything I'm painting with black
will turn red and it will be hidden. And you don't want to spend too much time
fine tuning these areas just yet. See how the result looks after we apply the
color and if it looks good, then don't worry about it. If you need to refine it,
then come back and refine it. I always tell people not to refine their selections
until they're sure that they're going to keep them or even need them.

Sometimes you don't need to refine the selections
because in the composite those little imperfections are not noticeable. Other times, you may not even
need the selection at all. So if you spend a lot of time fine tuning,
it's a waste of time. So fine tune at the end. I'm going to double click on the hand tool
to fit the image to screen, and you'll notice that we have a really good selection around
our model, and that's what we need. I'm going to press Q once again. The margin edge will come back, and you will
see that we selected those areas that we painted on. The next step is to create the fill layer
that we're going to use to make the background a different color, and we're going to use
a solid color adjustment layer. So I'm going to select it from the adjustment
layer menu and I can select the color. I'll just select red for now and press okay.
The problem now is that we actually have the
color inside the model, not outside. So we can simply solve that by clicking on
the layer mask icon and clicking on the invert button in the properties panel. So once I click on invert, those colors invert,
and now the red is outside and the model is in front. The problem that we have now is that the shadow
is not showing and I would like for my shadow to show. That way, this effect looks more realistic. The easiest way of blending the images so
that the shadow shows up is by using a blending mode.
Which allows us to blend the two images together,
and the blending mode that I'm going to use is Multiply. So once I select multiply, notice the shadow
comes back and the image looks much better. You can even see some of the strands of hair
underneath her hat. At this point you can just double click on
the solid color thumbnail so that you can click and drag and select a different color. For example, maybe we'll go for a blue-green
color like this one, and you can change the intensity of the color by clicking and dragging
within the window, and you can fine tune it any way that you like, and you can press OK
when you're done.
You can, of course, use the zoom tool, zoom
in and make sure that everything is looking good, and I think that for the most part everything
looks really good and I don't think I need to fine tune anything else. So I'm going to zoom back out. And just like that, you've changed the color
of a background. I would like to ask you for two quick favors. If you enjoy this tutorial and you think that
it will help you in your creative projects, then go ahead and click on that like button
now and let me know in the comments below how you plan on using this technique. I hope that you enjoy this tutorial. If you're new to the Photoshop Training Channel,
then don't forget to click on that subscribe and notification buttons. And I will see you at the next tutorial..


