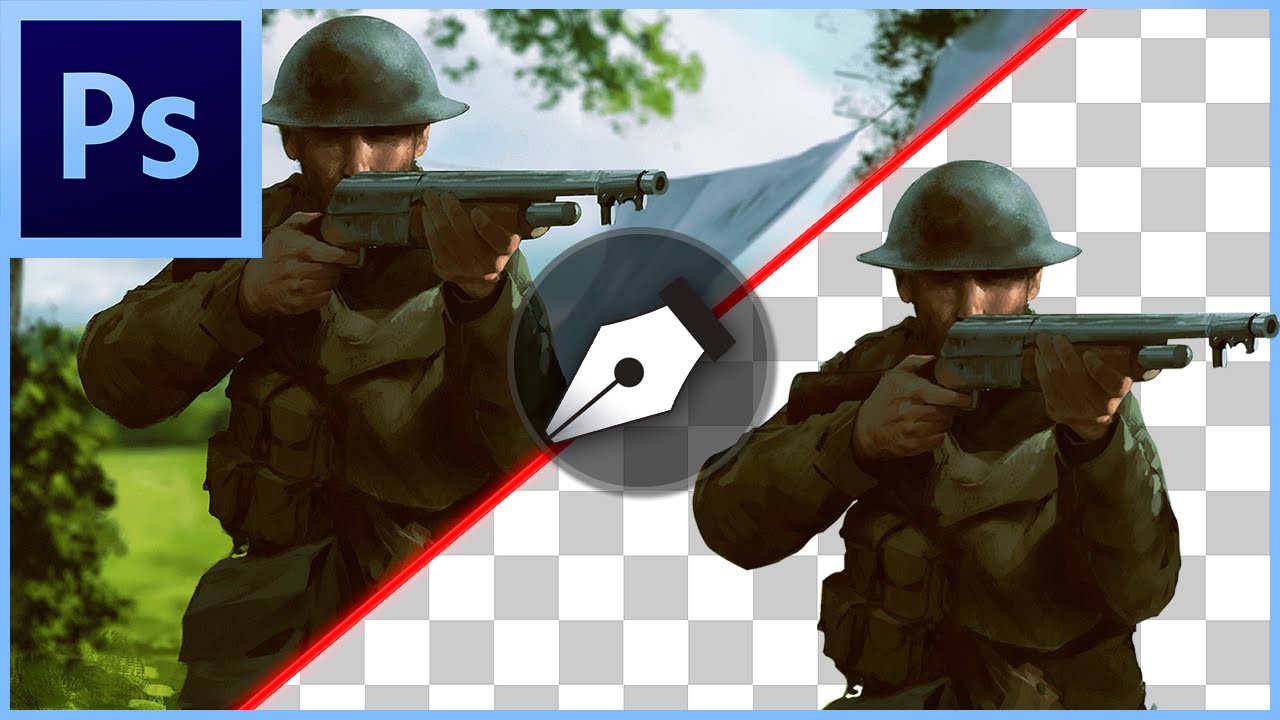
Photoshop CS6/CC: How To Cut Out an Image & Remove/Delete a Background
bhadra 0 Comments Acrobat After Effects Illustrator Indesign Light Room Photoshop Premier
Hello everyone this is VerticDesigns here, and for this video I'm going to show you that Best way to remove a background in Photoshop. Now there are many different tools and ways to do this But I like the pen tool a lot more because it's much more accurate and you Could tell the computer. You could use the quick dial tool or the magnet, but they have a guess, so they are Not very accurate That's why I use the pen tool instead. To cut the picture what you want to do is want to go to the left side Where all the tools are. Click the Pen Tool. If it's not selected, you can right click and it should be here, but by default it should be Be the top, so you should already see it. Once you've chosen what you want? Do what you want, keep old and use it Go up the scroll wheel. Then you want to zoom This makes it easier for your eyes to see what you are cutting out. It just makes it easier for me because I can see the parts that I missed and the parts I have to do that Well, to start it, what you want to do is choose a corner, mine will usually be At the bottom or at the top.
What we're going to do is we'll go make a point to make some kind of situation where we are To connect them all at the end and then we'll duplicate the layer that Will then remove the background. Now to start it you wanna go here and we'll start in this corner exactly there. Make sure you're on the line and go all around. There are two important things you need to know about the pen tool. The first thing is that if you click normally, it will give you a straight line.
Now if you do it ctrl + alt + z to undo it and do where you keep it. Where you hold the left side of the mouse, it will give you that curved line that is Really useful to know. I use it all the time because there are pictures that I have to do this. It's a kind of curved line, if you look at it there will be a gap, so we Our picture wants to look good Now you want to click here and drag it in like this Then, to get rid of yourself, you want to hold old and push on until you get that small Icon symbol. Now that you've done that, just keep walking around it and I'll speed up the video Just to make it faster for you because it will take a while and yes … When you come across bits like that, you don't need to really care too much because You can cut it out later, so what's that, we'll do it We'll just leave it now.
Keep going. As you can see, this is the type of situation where you want to do it. Where will save you a lot of time and it is pretty accurate but you have to do it It's a little bit smaller and that's where we're going Now it looks a lot better than having To walk around Now that we're at the end what you want to do is to shrink a bit so we can Can you see the picture. Yours will be a little different to me But mine is half cut I can't really do that What I'm going to do is just a rough sort of selection around it.
To connect it, you just go back to the first dot and you click on it when the icon Appears with a circle As soon as everything is connected you will see that It is now a line, all points are gone You just go to the top here to choose from. Make sure you have everything like me Make sure the suspension is at 0%. Unless you really want to feather tie without shackling him, it makes it sharper and This is what we want.
We want a sharp outline that looks good. Anti-aliasing is on and new choices. So once you've done that, press ok. Then we'll shrink a bit more so we can actually see what we're doing Now that you've chosen it, that's the easy part All you do, do it ctrl and j. Now what that does is that it's going to duplicate the layer and we have the background still on. But if we go to the top and we hide that one.
You can see that the background is now gone. As you can see, it is really good and sharp outline. That is exactly why I prefer the pen tool. It gives you a really nice result compared to other tools where you could get the white sketch. The one thing that you want to make sure is that the bits that you left out were inside the picture. Let's say that they had a piece where you could still see something from the background. You just want to go back there. Use the pen tool and just go around it's really quick It doesn't have to be too perfect because the selection will make it look good. Go back to the selection. 0% and press the button.
For the last step, what you want to do is just put it in the background and have a look To your result. If you are happy with it, if you are not you could always go back. But to me I think mine looks pretty good And you just wanna stretch the picture the right place. Make sure it's below. Once you have the background, you can now move over the object where you want it. It would look a little better for me if I brought him here and made him a little small. To really make it look like that, it's there. For me all I have to do is make him the right size. So probably a little smaller, that would look good. Then you want to go to Mixing Options. Change the color, make it look like the From Where Its At. So for me it's kind of like a blue hard kind of, darker. Dark blue a bit like that and just going through the effects.
See which one looks good. We don't want much. Maybe this is here. Anyway, that was the best way to remove a background in Photoshop. At the moment it doesn't look very good, my picture Because it doesn't mix with the law Colours. But I can edit that again later. Now I'm going to leave it like this. But the whole point of this video was to show you how to remove a background and really get one Good result from it Now even if you are exactly like you Get moments where you get a little bit An outline To remove that, it's easy. All you have to do is right click on it Go to Blending Options. Here go to the stroke. Make sure you set this to 1. Go inside and then, once you've done that, go over here Where is it called mixed mode and do that to screen It's just cut and it's gone now If you're outline you can be fatter just increase and it will get Get rid of more.
But for me I think that will be ok Let's get out and yes. It's pretty much that. Anyway, that was the video. If it was helpful, share it with a friend who might find this useful too. Comment below for what you think of the video and I'll see you all in the next video. Bye.
Posted in Acrobat, After Effects, Illustrator, Indesign, Light Room, Photoshop, Premier


