Photoshop QUICK Tip: Auto-Blend (CS6 and later)
bhadra 0 Comments Acrobat After Effects Illustrator Indesign Light Room Photoshop Premier
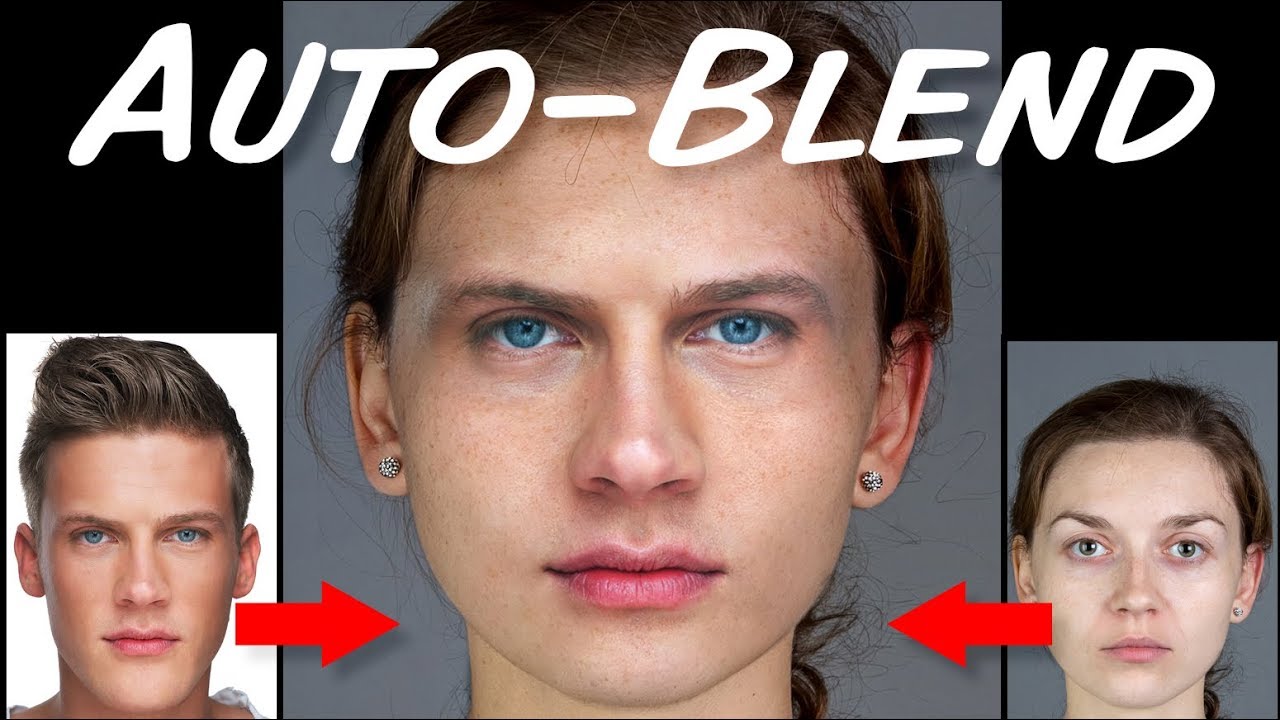
Hi. This is Marty from Blue Lightning TV with another Photoshop quick tip. If you're using CS6 or later, I'm going to
show you how to automatically stitch or combine images together that have very different brightness,
contrast, color and tone. Auto-Blend doesn't work with Smart Objects,
video layers, 3D layers, or background layers. For this example, I'm going to stitch the
face from this guy onto her face and use Auto Blend to blend them together. I downloaded both of these photos from Shutterstock. This tutorial is for those who are already
familiar with the basic functions of Photoshop. As I mentioned, I'll use this photo as the
base. Since the outside corners of her eyebrows
extend pretty far, I'll remove them, but first I'll make a copy of the layer by pressing Ctrl or Cmd + J, so I always have the original photo intact.
If you have areas in your base image that
you want to remove, open your Patch Tool and draw around the area you want to remove. Drag the selected source area to a destination
area that you want to use to repair it. To deselect it, press Ctrl or Cmd + D. I'll
repeat this with the other eyebrow. Open your other image. We'll make a selection around the area that
you want to patch onto your base image. Open the Lasso Tool and make sure "Feather"
is 0 pixels. Draw around the area that you want to place
onto your base image. Open your Move Tool by pressing "v" on your keyboard and drag it onto the tab of your base image. Drag it down and release. To resize and reposition it, open your Transform
Tool by pressing Ctrl or Cmd + T. Position and resize it over the base image. Ctrl-click or Cmd-click the top layer to make
a selection of its shape.
Go to Select, Modify and "Contract". I'll contract it 10 pixels. Depending on your document's size and resolution,
you may want to adjust the amount. Make Layer 1 active and press the "Delete"
key to delete inside the contracted selection. Press Ctrl or Cmd + D to deselect it. Shift-click the top layer to make it active,
as well, and go to Edit and "Auto-Blend Layers". Since we're blending stacked layers, tick
"Stack Images". Make sure "Seamless Tones and Colors" is checked
and if you're using a later version of Photoshop, check "Content Aware Fill Transparent Areas"
just to ensure that all areas will be filled and blended well. If you see this warning, just click OK. Auto-Blend applied layer masks as needed to
each layer to mask out over or underexposed areas, as well as, mask out content differences
to create a relatively seamless composite. Since we have the composite layer, we can
hide the layers with their layer masks. Next, we'll adjust our image's brightness
and contrast. Scroll to the top of the Layers panel and
click the Adjustment Layer icon.
Click "Levels". We want the adjustment layer to restrict itself
to affect just the composite layer below it. To do this, click the Clipping Mask icon or
press Alt + Ctrl + G on Windows or Option + Cmd + G on a Mac. You can also go to Layer and "Create Clipping Mask". For this particular image, I'll drag the Input
Mid-tone slider to the right to darken the mid-tones, however, feel free to adjust the
input settings for your image.
If you want to restore the background or any
other area from your original base image – no problem. Make the Levels layer mask active. We'll brush in black over it, which will mask
out the areas we brightened or darkened. Open your Brush Tool and make sure your foreground
color is black. Open your Brush picker and pick a soft, round brush. We'll adjust its size in a moment. Make its Hardness 0% and the Opacity & Flow
both 100%. To make your brush bigger or smaller, make
sure your CapsLock key is off and press the right or left bracket key on your keyboard. Now, brush over the background and any other areas you'd like to restore from the original base photo. This is Marty from Blue Lightning TV. Thanks for watching!


