The COMPLETE Adobe Photoshop Tutorial For BEGINNERS! (2020)
bhadra 0 Comments Acrobat After Effects Illustrator Indesign Light Room Photoshop Premier
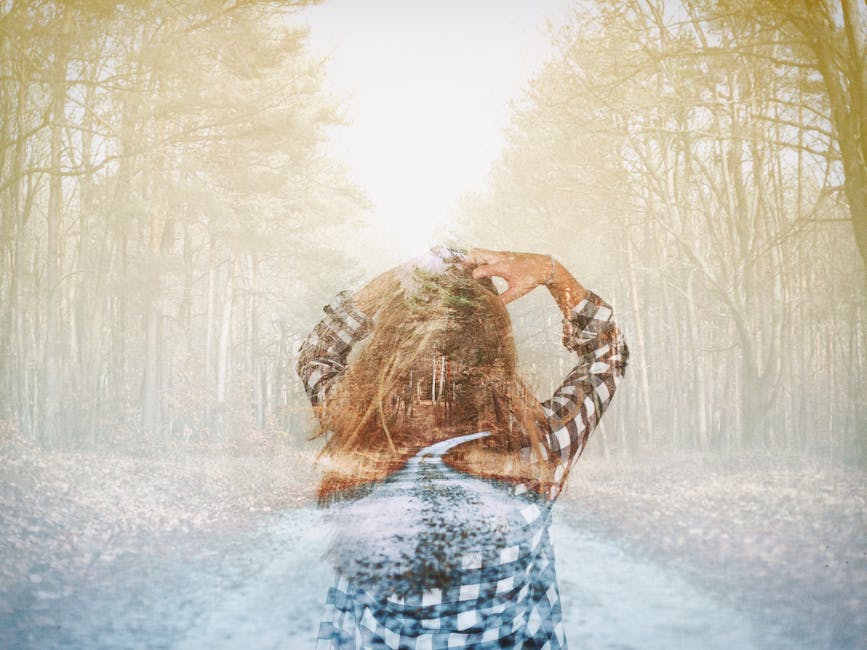
welcome to a brand new video on the channel now in today's video i'm going to be teaching you how to use photoshop cc from start to finish now in this tutorial we're going to be creating this image right here and the reason we're going to be making this example image is because it will allow you to explore all of the core concepts of photoshop so you're going to be able to learn how to manipulate images as well as create graphics so all the way from blurring this background to removing the background of this person to adding text and shapes and everything in between now i know photoshop is also pretty expensive if you don't have photoshop yet i'll also link a trial so that you can actually try it out and see if it's something that you actually want to use and with that being said let's get started so when you open up photoshop for the first time you're going to be greeted with this page and this is basically where you can open up recent files and create new ones so we're just going to click on create new and here we're going to find all of these settings for our new image so i'm just going to name this file thumbnail and then here you can set the dimensions so i'm going to make it 1920×1080 and then you can set the resolution if you're creating something that's high resolution you can make it 300 pixels per inch and then you can choose the color settings as well as the background contents so we're just going to make the background transparent and then click on create so once you create your file you're going to be taken to the workspace and as you can see there is a lot going on but the first thing we have to make sure is that our workspace is properly set up so we're on the same page so all you want to do is go on window and then workspace and then click on reset essentials and it's going to take you to the essentials workspace and we're just going to close this learn tab because i'm here to teach you you guys don't need that learn tab and we're going to quickly just go over all of the different features now the first thing we're going to do is create a shape so on the left side here these are where majority of your tools are this is where you're going to be able to create different elements as well as select elements that you want to edit and then you're going to be able to make adjustments to them up here as well as on the right side as well where you're going to be able to manipulate the layers and then if we just create a rectangle for example you can see that right underneath this toolbar you have a secondary bar and here you can adjust the properties of whatever you're creating so the first thing we're going to be doing is making a shape which was the outline of the previous image so to select any of these tools all you have to do is click on them and if you hold down you can see that each of these tools also has sub tools so we're just going to use the rectangle tool and you can see that there's also a letter which indicates the shortcut of that tool so i'm just going to click on the rectangle tool and we're going to create a rectangle that is the same size of the canvas as you can see things are going to lock into place and then we're going to let go and it's going to create our shape now if i wanted to move this rectangle around i could click on the move tool and it would just let me move it around like so and i could also use the rectangle marquee tool to select the rectangle and then i could move around the entire rectangle like so now i like where the rectangle is but if i didn't like the exact positioning of it i could also press ctrl t which basically selects the layer and whatever is encompassing it and you can see this blue outline has come up now what i can do is i can actually drag on any of these anchor points to change the size or i can move it around like so now when you're dragging something by default it actually drags it in proportion but if you hold shift you can see that i can actually drag it and it's not going to hold its proportions so i'm just going to do is i'm going to drag this so that it covers the entire canvas and then i'm going to press on the check mark now if i wanted to edit this rectangle in terms of its properties all i have to do is make sure i'm on the rectangle layer and then i click on the rectangle tool and as you can see it automatically selected the rectangle and the properties are up here so what i can do is i can change the fill and so we're going to click on this white line or this white box with the red line and this basically means i don't want any fill and then we're going to go to the stroke and we're going to select the blue stroke and you can also choose any color by clicking on this gradient over here and you can select any sort of color you want now this is going to be the outline of the thumbnails we're going to select this light blue we're going to click ok and then i'm going to change the width to about 12px and that looks good to me now we've already covered a lot but a couple other things to keep in mind when you're creating shapes is that you can also press ctrl r or command r on mac and you can also create rulers if you wanted to create shapes within your canvas and you wanted them to line up perfectly so you can just drag a ruler by dragging out from wherever you're creating your ruler from and then if you want to remove this ruler you just press ctrl and then you drag it out and it will disappear now what we're going to be doing is we're going to be adding a background we're going to be blurring the background as well as using layers to make sure everything is set up correctly so to add another image to your file you just have to place it so all you want to do is go to file and then you want to go to place embedded and then we're going to go to downloads and i'm going to just download this image that i found from unsplash now as you can see this image right now does not fit the canvas perfectly so we're just going to drag it and not hold anything else because we want to keep the proportions and then we're going to click on the checkbox now as you can see our border has gone away and that's because when we look at the layers on the bottom right the layers show that the background image is on top of our border so to move a layer all you have to do is just drag it and you can also click on it you can also double click on a layer and then you can type out a name for that layer if you want to name it and there's also a couple other important layer settings so some other things you can do with layers that are very important is you can obviously change the opacity and down here you can add a bunch of different layer effects but what we're going to be doing is we're going to be clicking on this lock button and this is going to lock the border layer so if i go to the move tool i'm not going to accidentally move the outline because i know this outline needs to stay here and now it's locked into place now we're going to be doing is we're going to be making some changes to this background image so the first thing you have to do is make sure you have the right layer selected by clicking on it and then we're going to go to filter and here you can see there's a lot of filters you can add to your image so we're just going to be going to blur and then we're going to add a gaussian blur and we're going to be making it six pixels and we're going to click ok and as you can see it's going to blur our background and of course up here there's also a bunch of other effects we could add so we could add a bunch of other kinds of filters we could sharpen it if the image was too blurry but we're trying to make it blurry so we're going to keep it as it is but you can obviously explore and find other filters now this looks pretty good for our background i think the next step is to add a person over here so i'm going to go back to file place embedded and then i'm going to add the image of the woman now as you can see there is a background we're going to be removing that later on and we're just going to drag this over here and we're going to drag it out to make the image larger and we're going to put it right over here and we're going to click on the check mark now in order to remove the background we have to make sure this is a flat image so we're going to right click on the image to open up the properties of that image and some settings we can actually adjust and we're going to click on rasterize layer and it's going to basically make the image flat so we can use the other photoshop tools to remove the background now there's two ways we can remove the background the easiest way usually is to use the magic wand tool so if we just click over here and hold down it'll come up and if we click on it it'll select certain components of the image that it believes are homogeneous so what we see is if we use the magic wand tool and we select the background it's also counting this part of the shirt as the background and it's essentially thinking that the part of the arm over here is pretty bright and so it's bleeding all the way into here and selecting as well so if we clicked on delete it would delete all of it which is not what we want instead what we're going to do is we're going to use a different tool right above it called the magnetic lasso tool and we're going to use the magnetic lasso tool to highlight around this part of the arm and then delete the background over here because this is the issue that's making it bleed into here once you remove this part of the background the rest of the background is going to be able to you know be deleted with one single click so the first thing we have to do is we have to make sure we have the magnetic lasso tool selected and then what we're going to do is we're going to press control plus or command plus on mac to zoom in and you can also find the zoom down here and we're just going to move over here and start using this tool so to use a magnetic lasso tool all you have to do is click and just let go and then drag and if you want to create more points you can click keep clicking and basically it'll kind of like a magnet go around this girl's arm and if it's not doing that we can click to add our own points but right now it's doing a really good job of automatically adding these points so here it kind of messed up we're just going to create our own points by clicking like so and then it should be good from here and this was basically the issue it was this entire part of the arm right so once we have this part of the arm selected we can kind of just close off this shape by clicking like so and now it's going to select it and we can click on delete and it's going to delete that part of the background and then we can press ctrl d now if i press control plus and zoom in we can see we missed some of the background which is fine because we can also use the eraser tool so if we click on the eraser tool we can see the eraser properties come up over here and we're going to make the hardness 100 and change the size so now the size is six percent and we can just click over here to erase the remainder of the white background and kind of just smooth it out now this isn't a perfect job i'm just trying to show you how these tools can work together to you know get you the desired results you want so we have this part of the arm removed now and we can go back into the magic wand tool and we can select it and then if you click delete everything else gets removed without a problem and same with down here and boom boom there we go and if you press ctrl or command d it'll deselect whatever is being selected and we have the background removed now while we're going through these tools there's a few more things i'm going to cover quickly the first one is the crop tool so if you click on the crop tool you can actually just change the size of the entire file like so so if you were repurposing something for social media that's a good you know use case we also have the eyedropper tool so if we click on the eyedropper tool it'll basically allow us to select certain colors so if i click on the blue for example it sets the color down here to blue if i was to create a new shape now it would be the same color as the eyedropper tool and then right underneath that we have the spot healing brush tool so basically this is used to remove blemishes now this woman does not have any blemishes but just to show you i'm going to zoom in by pressing ctrl plus a few times and then i'm going to go up and if we were to just rub over here we can see it's removing her forehead wrinkles and you can use this for any other blemishes photoshop is pretty smart with this stuff now another way we can also adjust this image is by going into image and then adjustments big surprise and here we can see a bunch of other settings that we can also use to manipulate this image so we're just going to change the vibrance a little bit and i'm going to make the image a bit more vibrant and then click ok but obviously you can go through all of those settings and apply custom changes as well and now finally we're going to be adding some text so to add text all you have to do is go to the horizontal type tool over here and then you're going to see the properties of the text come up at the top so i'm just going to change the font color to white and i'm going to click on the canvas and it's going to create a new text layer so we're just going to make this text at the very top right before the borders i'm going to click over here and then when i click on the actual canvas it's going to create the text layer right above and we're going to just make the font say coolest now you can also highlight the text over here and change the font change the style of the font change the size of the font and then also change the alignment and the color and what's really cool is you can also just change the color of certain letters as well if you highlight them before you change it so we're just going to highlight this and make the font a little bit larger we're going to make it 450 and we're going to click the check mark to make sure that it is completed and then to move this text we just have to go to the move tool and we're going to move it over here like so and we're going to create a second line of text so we're going to do is we're going to right click on this layer and we've already looked at these layer settings when we were rasterizing the layers but now we're going to do is we're going to duplicate the layer and we're going to click ok and it's going to create another layer right on top so we can't see it yet but if we go to the text tool and we click on it we can actually see that only one of the text layers is selected and i'm just going to change the text to setup and then i'm going to press ctrl a or command a on mac to select all of it and i'm going to just change the font to something different and then i'm going to change the font size to maybe 400 maybe a little bit smaller so 375 and i'm going to click on the check mark and then i'm going to click on the move tool and i'm going to move it down now when you're moving something you can also press shift and if you hold shift and drag it it's going to only move the text on one access so we can see that right now it's still horizontally aligned like so now say we accidentally messed it up and we moved it like this and we still want the text aligned it's very easy to align layers all you have to do is make sure that you control click on the layer that you're aligning to so i'm going to control click on coolest and then i'm going to make sure i have the layer i want to actually align which is the setup layer selected so right now i'm aligning setup to coolest and then we just have to go to layer align layers to selection and in this case horizontal centers and we can see that setup is going to align to whatever is highlighted which is coolest and it's going to align horizontally and then we can just press ctrl d or command d to deselect that and we're just going to move it back up a little bit and our text is in place and now it's time to add some effects to our text which we're going to be doing with the blending options so there's actually a lot of ways you can edit the current properties of the text first of all you can click on the text with the text tool and the properties show up up here you can also edit the properties over here we're going to be doing something called adding blending options which is achieved by right clicking on a layer and then going to the blending options and here you can make some final adjustments to your image and there's a lot of different things you can do so you can add a bevel and emboss you can add a stroke for example but we're going to add a gradient overlay which is basically just a color gradient on top of this image and i just selected the black and white gradient so you can click over here and it's going to open up the gradient settings and you can double click to change the colors of the gradients or i'm just going to keep the black and white one and because the opacity is set to only 16 you don't see the full black to white but rather it creates kind of a shining effect i'm actually just going to make this 12 and another effect we're going to be adding is a drop shadow so all you have to do is click on the drop shadow button so as you can see the drop shadow the blend mode is on multiply it's slightly transparent and is going to be casting a shadow at a 90 degree angle at the following spread in size and once i click on ok it's going to apply these blending options and you can actually see that this text looks a bit different from the setup text now we can add the same effects to the setup text by right clicking and going to blending options and doing it all over again but this takes a lot of time and instead we can just use layer styles so basically what we can do is right click on the coolest text which already has the effects and go to copy layer style and this is basically you know copying all of the stylings which in this case include the gradient and the drop shadow we can right click on setup and we can go to paste layer style and boom the same effect is added to setup now we're going to be doing is we're going to also be slightly modifying this girl over here because we didn't do a perfect job of cutting her out we're going to go to her layer and also go to the blending options and then we're going to actually add a stroke and we're going to add a one pixel stroke that is in the center of her so not inside or outside and basically this gets rid of kind of the white line that was created from the pore cut out and then we're going to click on ok and as you can see we're almost done our thumbnail now the final tool that i think is really important that i did not go over is the brush tool so we're just going to go ahead and hold down the brush tool and select the brush one and we have to create a new layer for this and the way the brush tool works is very simple but depending on the color you can add a brush to your you know image now the brush is going to be created off two properties the size of course and the hardness basically 100 hardness is a straight line whereas zero percent hardness is more of a soft brush so we're going to actually have a zero percent hardness brush and we're going to make it approximately 700 pixels we're actually going to make this a little bit bigger we're going to say 750 we're going to click on the color over here and make it a lighter blue and we're just going to add a brush effect to our thumbnail which i think will make it look really nice so all you have to do is click and it's going to apply the brush we're going to click again over here over here maybe a slighter one over here and one over here and we have this brush effect now it's a little bit too much right now we're also going to lower the opacity by clicking on the opacity setting where the layers are and we're just going to bring it down to maybe maybe 22 and then we're going to move this layer so that it's underneath the text and the image so all we have to do is just drag this layer down and we have the brush effect added and if i was to just click on this you can see that it actually makes quite the difference but there is our image our thumbnail is complete and hopefully you learn the core concepts now all we have to do is save our image so if you wanted to save an image as you were going along you click on file and save and it's going to save as a photoshop psd photoshop file and we have to just click on save and then click on ok and you can also keep pressing ctrl or command s to save as well now we're going to be finally saving this image as a png or basically you know exporting it so we can actually use this image and to do that all you have to do is go to file we have to go to save as and then we can choose the location and the file name and the type is going to be a png and i'm going to click on save and we're going to make this a large file and then we're going to click on ok and it's going to save our image which we can now open up anywhere else so hopefully you guys did enjoy this video and you learned a thing or two i know photoshop is pretty complex but i wanted to cover as much as i could in a short period of time so hopefully you guys would enjoy that if you did be sure to give this video a big thumbs up and as always thanks for watching my name is iovo and i'm signing out